
Assembly & Quick Start
Source: X2D AMS Combo Quick Start Guide · PF004-P1SA007
This guide merges the Bambu Lab X2D and X2D AMS Combo Quick Start guides into a single walkthrough. Every step below applies to both machines, except the steps marked “AMS Combo only”, which apply solely to the X2D AMS Combo bundle (the printer packaged together with the AMS 2 Pro). If you have the bare X2D, you can skip the AMS Combo-only steps.
1. Read Before Use
To ensure safety and optimal performance, please follow these guidelines:
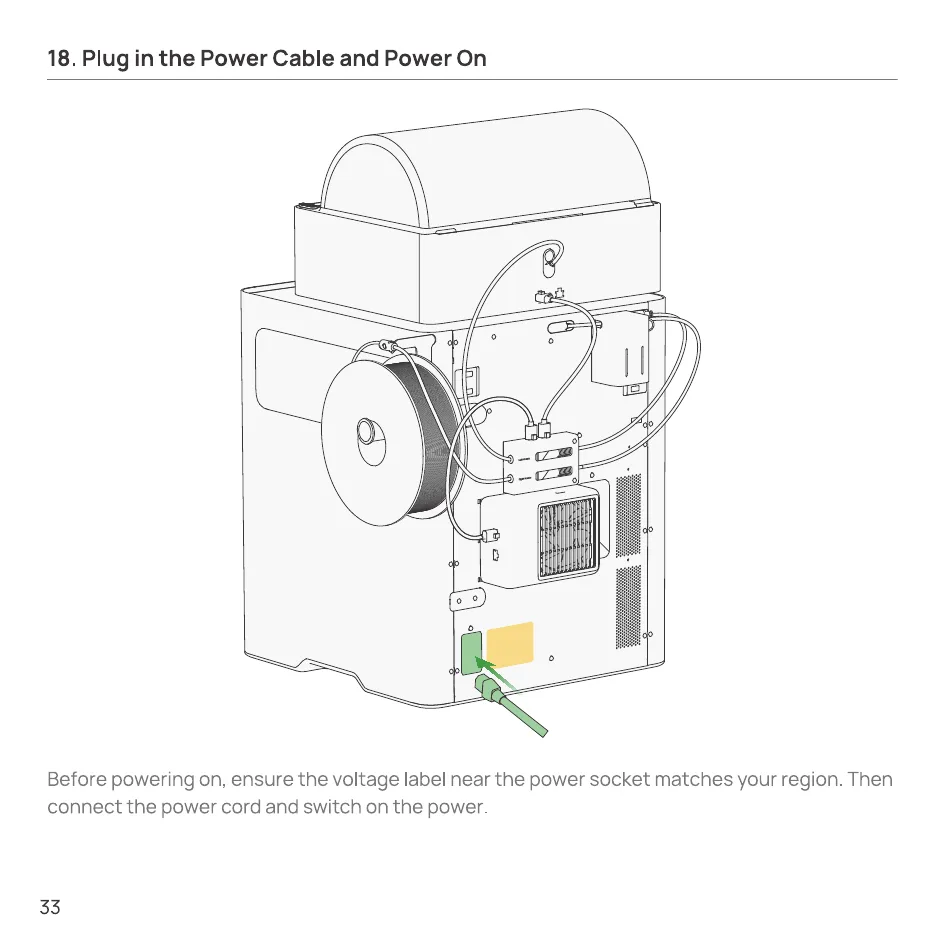
- Verify that the printer’s operating voltage matches the specified requirements to avoid damage or safety hazards. This can be checked on the label next to the power socket. Refer to the “Printer Specifications” section for details.
- Regular maintenance is essential to keep the printer’s complex mechanisms running smoothly. For guidance, see the “Regular Maintenance” section.
- For best results, we recommend using Bambu filaments, which have been rigorously tested for compatibility, safety, and stability with the product.
- The AMS 2 Pro supports a spool width between 50 mm and 68 mm and a diameter between 197 mm and 202 mm. We recommend using plastic spools.
- You can use the drying function of the AMS 2 Pro using only a 6-pin cable to connect it to the printer. If you need to dry filaments in multiple AMS 2 Pro units, you need to purchase official Bambu Lab power adapters to power the drying function of the other AMS 2 Pro units.
- During filament drying, the AMS 2 Pro removes moisture through external air circulation via the air inlets. Please ensure the air intake and vent are not blocked to ensure optimum drying efficiency.
2. Printer Component Introduction
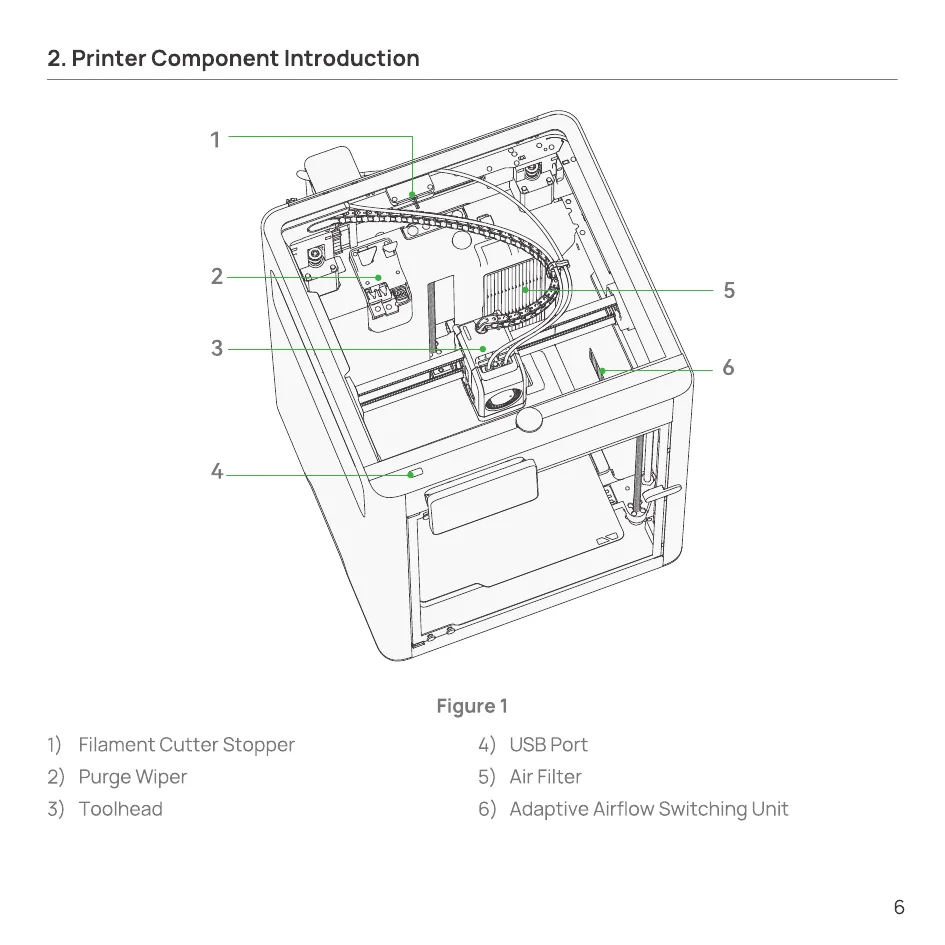
- Filament Cutter Stopper
- Purge Wiper
- Toolhead
- USB Port
- Air Filter
- Adaptive Airflow Switching Unit
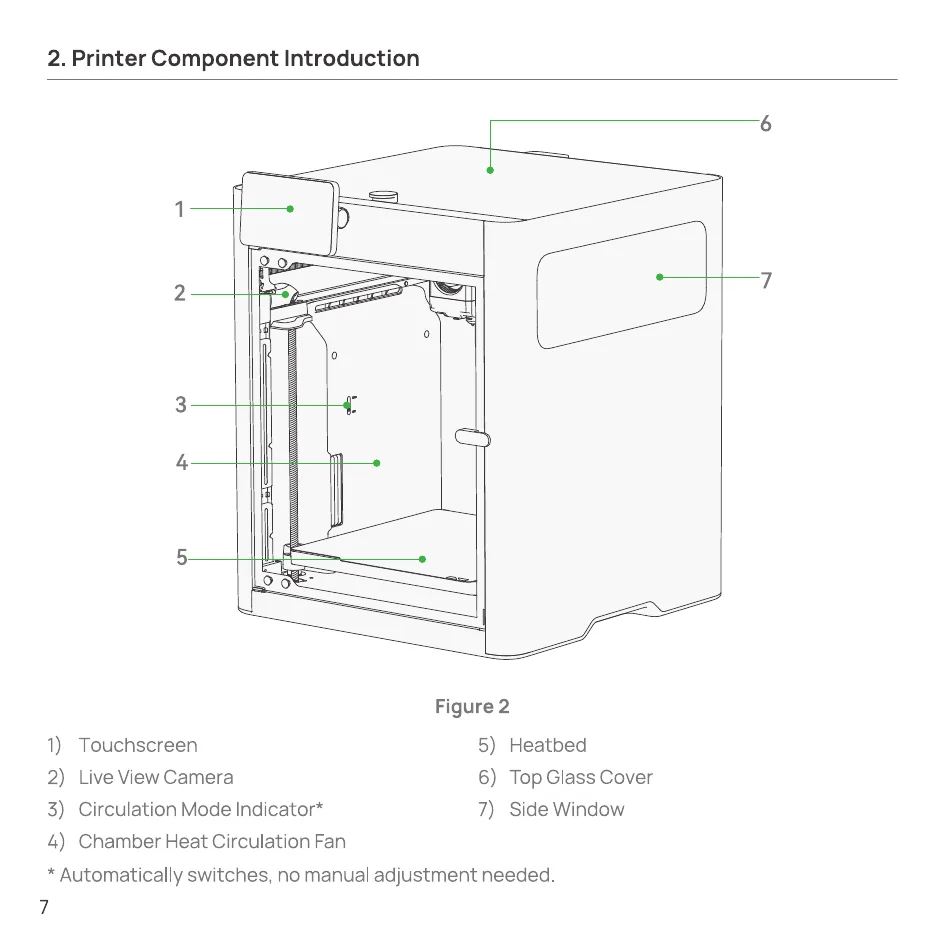
- Touchscreen
- Live View Camera
- Circulation Mode Indicator*
- Chamber Heat Circulation Fan
- Heatbed
- Top Glass Cover
- Side Window
* Automatically switches, no manual adjustment needed.
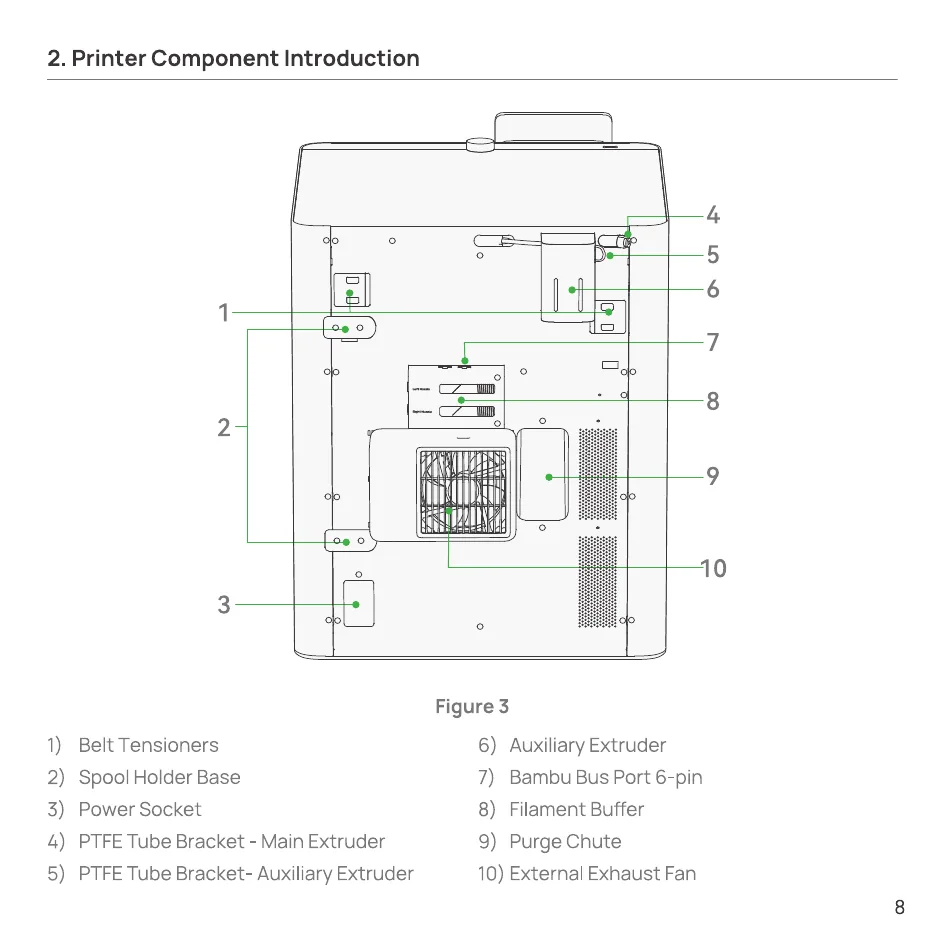
- Belt Tensioners
- Spool Holder Base
- Power Socket
- PTFE Tube Bracket - Main Extruder
- PTFE Tube Bracket - Auxiliary Extruder
- Auxiliary Extruder
- Bambu Bus Port 6-pin
- Filament Buffer
- Purge Chute
- External Exhaust Fan
3. Toolhead Component Introduction
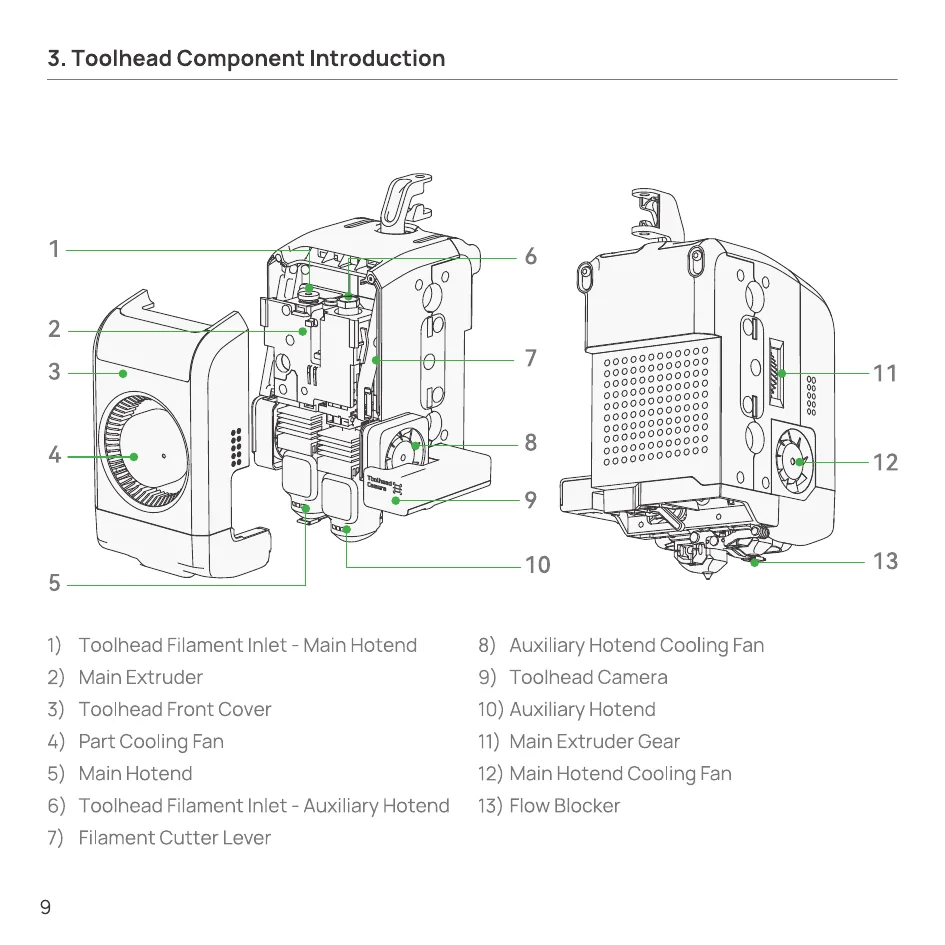
- Toolhead Filament Inlet - Main Hotend
- Main Extruder
- Toolhead Front Cover
- Part Cooling Fan
- Main Hotend
- Toolhead Filament Inlet - Auxiliary Hotend
- Filament Cutter Lever
- Auxiliary Hotend Cooling Fan
- Toolhead Camera
- Auxiliary Hotend
- Main Extruder Gear
- Main Hotend Cooling Fan
- Flow Blocker
4. AMS 2 Pro Component Introduction
AMS Combo only
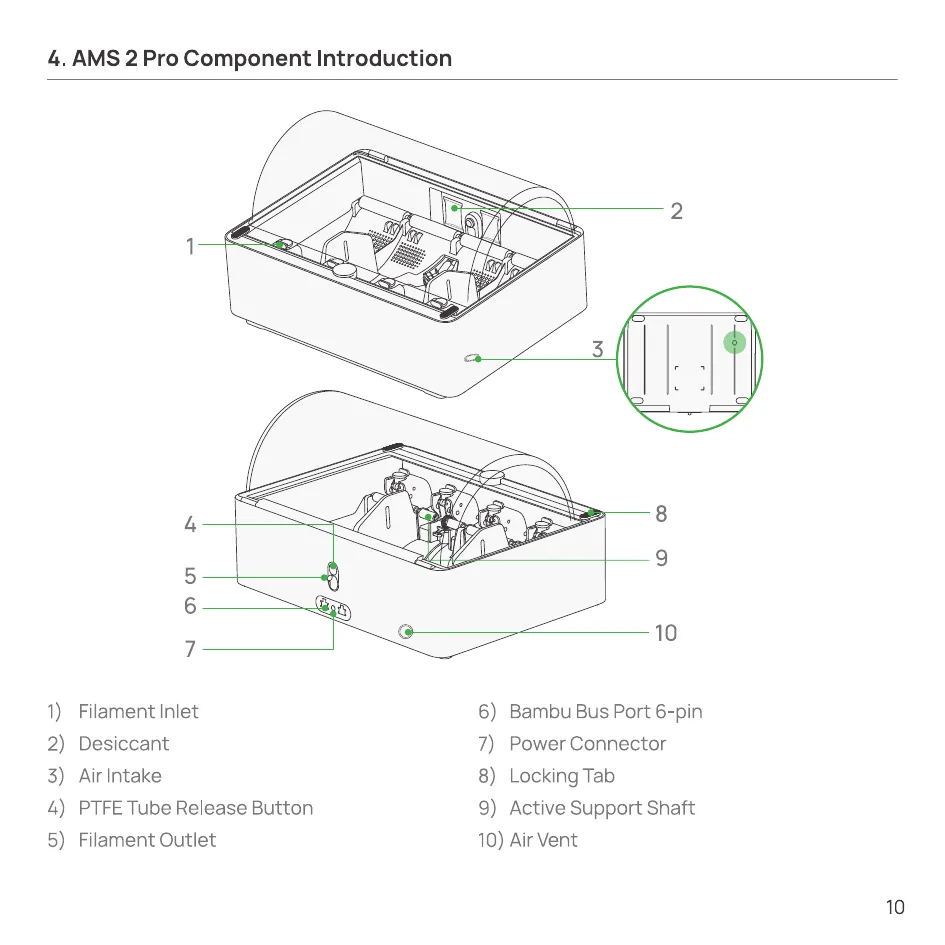
- Filament Inlet
- Desiccant
- Air Intake
- PTFE Tube Release Button
- Filament Outlet
- Bambu Bus Port 6-pin
- Power Connector
- Locking Tab
- Active Support Shaft
- Air Vent
5. Included Accessories
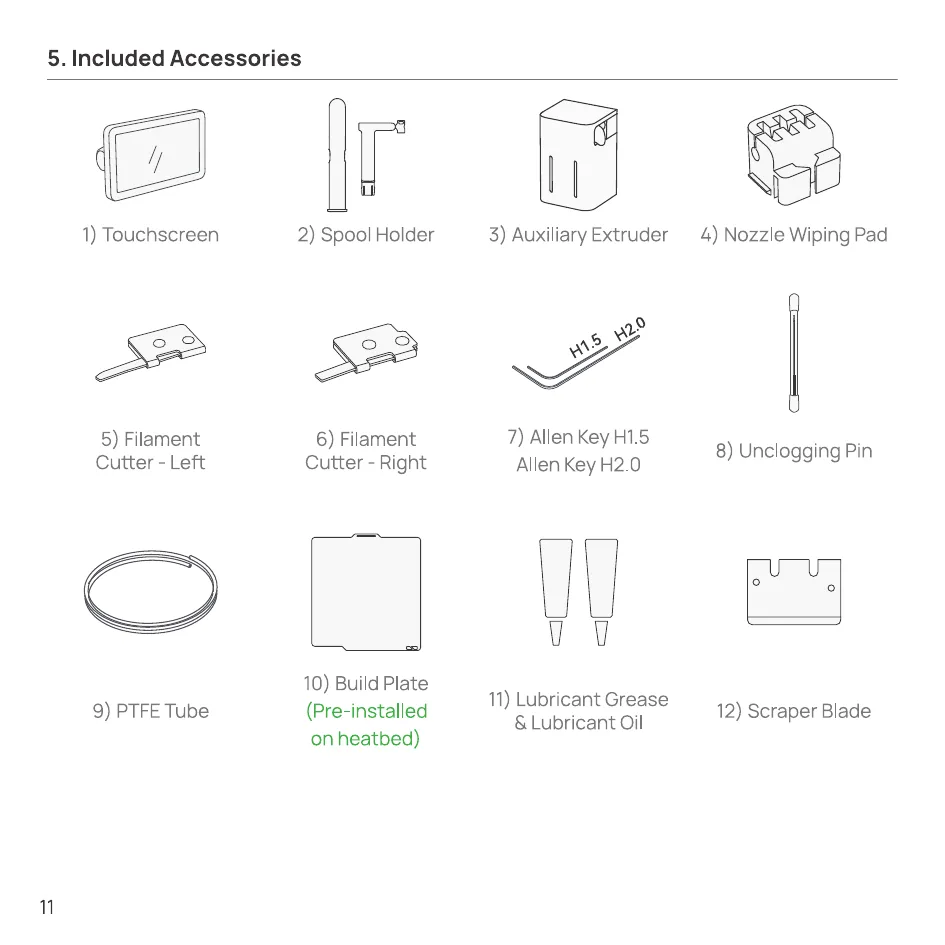
- Touchscreen
- Spool Holder
- Auxiliary Extruder
- Nozzle Wiping Pad
- Filament Cutter - Left
- Filament Cutter - Right
- Allen Key H1.5 / Allen Key H2.0
- Unclogging Pin
- PTFE Tube
- Build Plate (Pre-installed on heatbed)
- Lubricant Grease & Lubricant Oil
- Scraper Blade
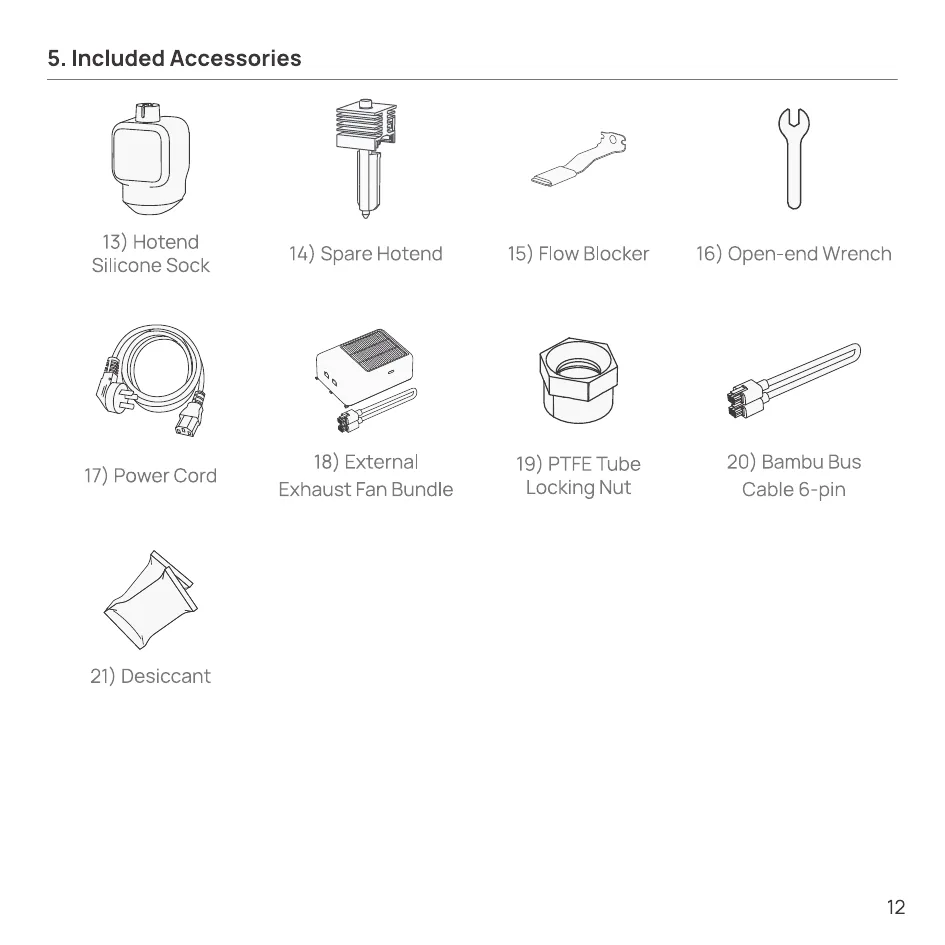
- Hotend Silicone Sock
- Spare Hotend
- Flow Blocker
- Open-end Wrench
- Power Cord
- External Exhaust Fan Bundle
- PTFE Tube Locking Nut
- Bambu Bus Cable 6-pin
- Desiccant
6. Remove the Package
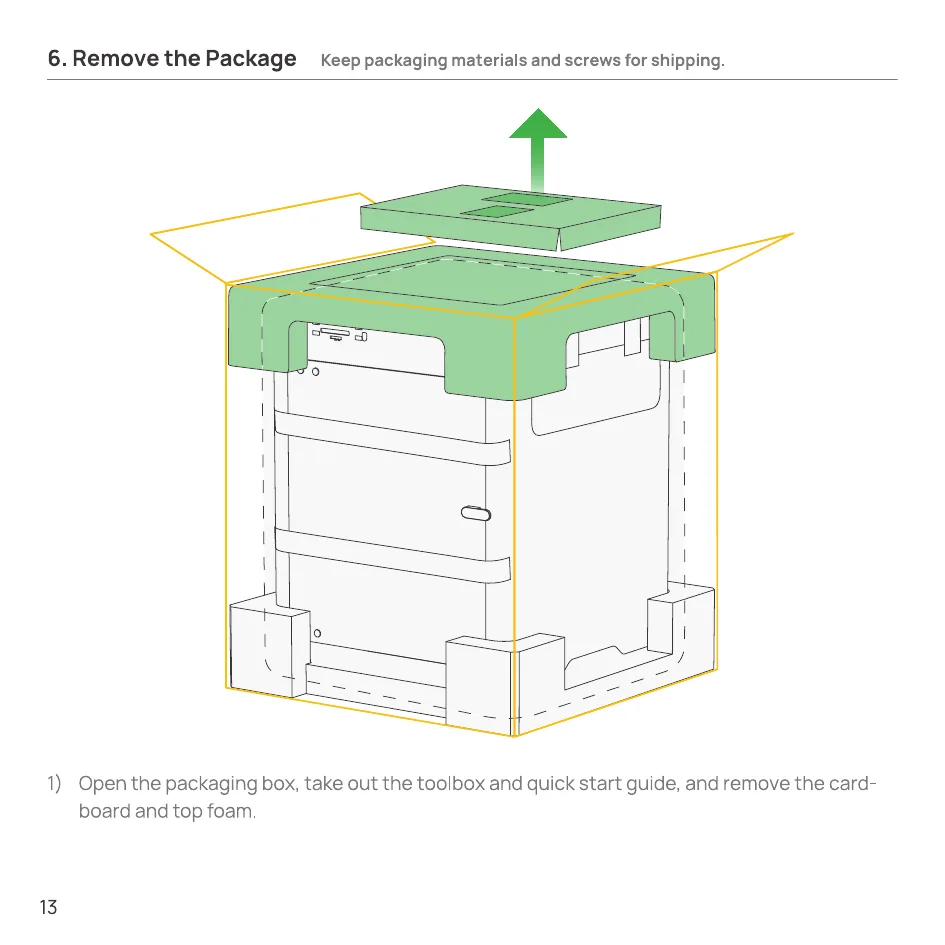
- Open the packaging box, take out the toolbox and quick start guide, and remove the cardboard and top foam.
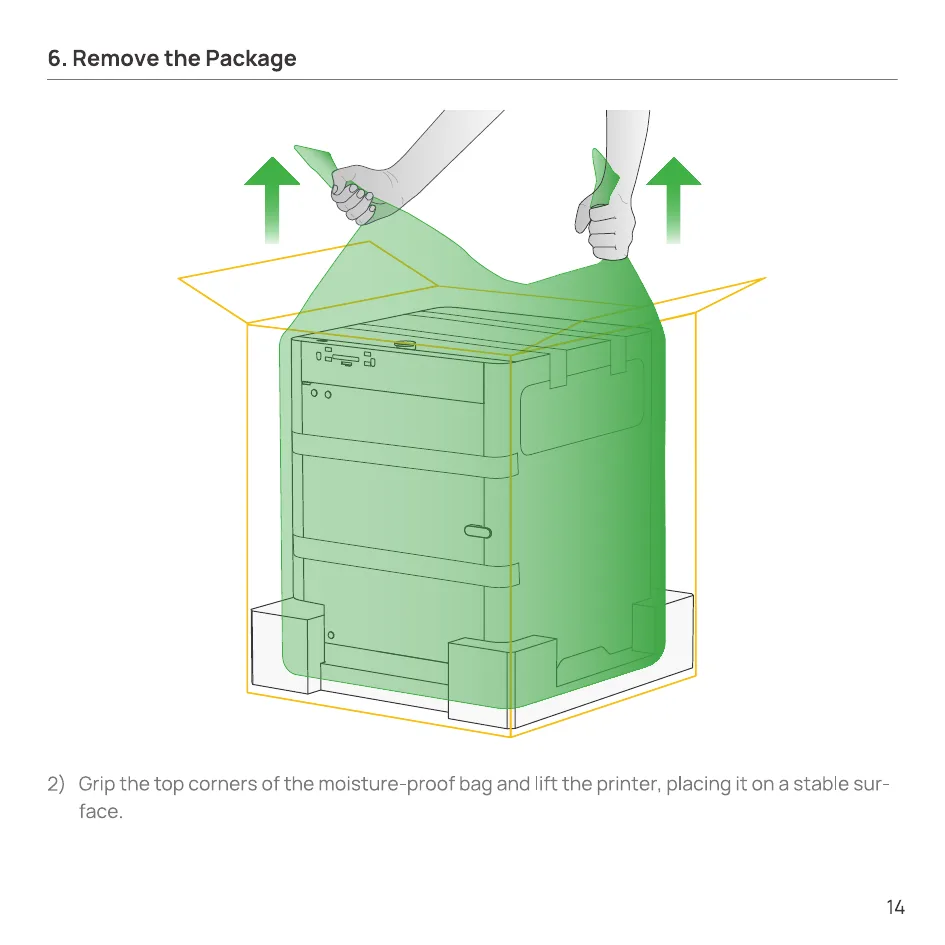
- Grip the top corners of the moisture-proof bag and lift the printer, placing it on a stable surface.
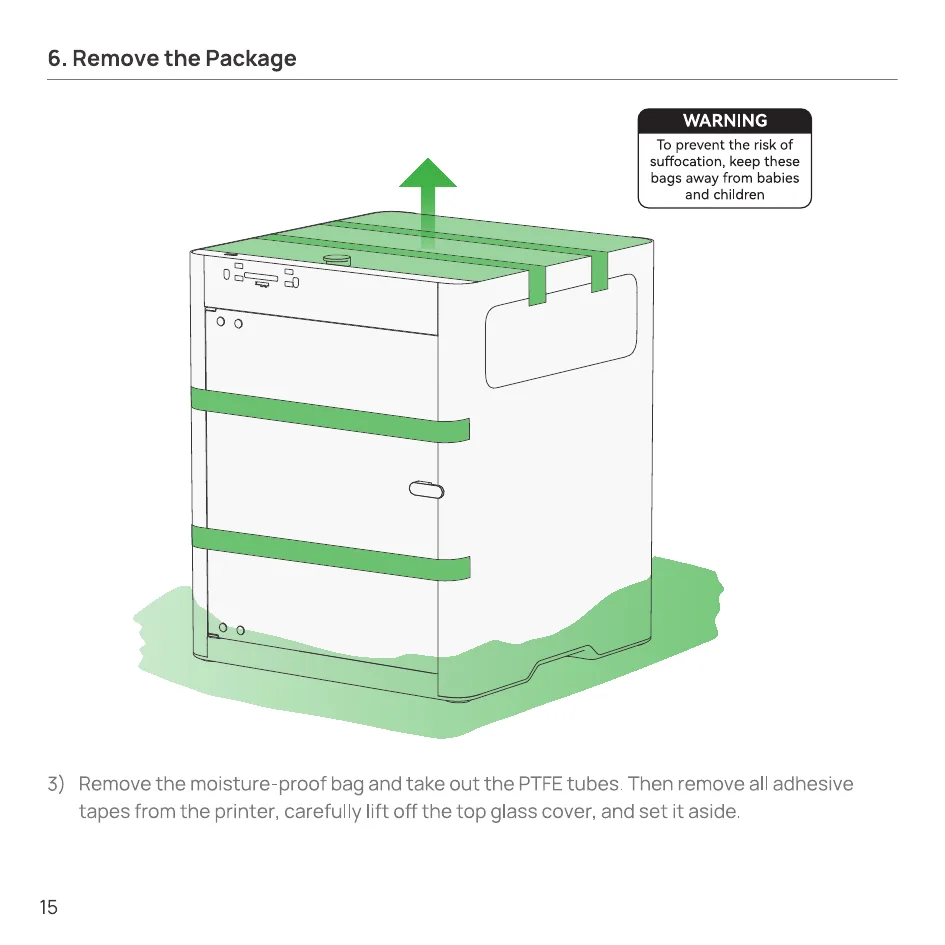
- Remove the moisture-proof bag and take out the PTFE tubes. Then remove all adhesive tapes from the printer, carefully lift off the top glass cover, and set it aside.
7. Unlock the AMS 2 Pro
AMS Combo only
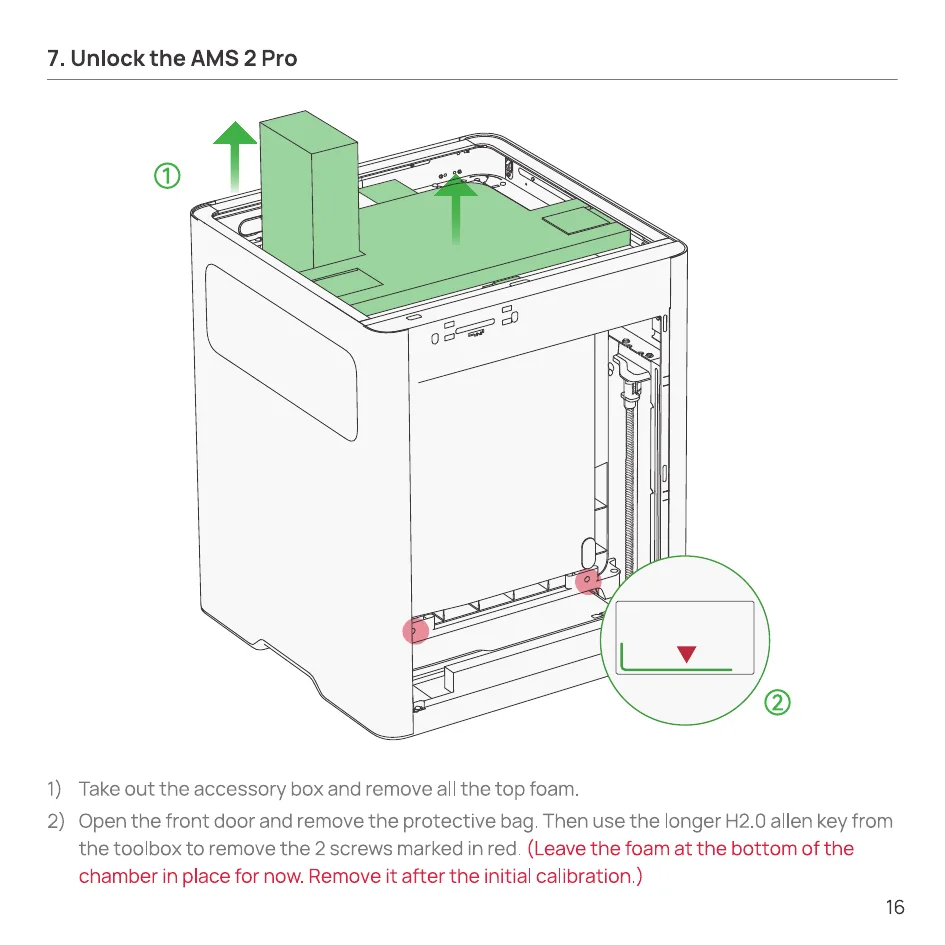
- Take out the accessory box and remove all the top foam.
- Open the front door and remove the protective bag. Then use the longer H2.0 allen key from the toolbox to remove the 2 screws marked in red.
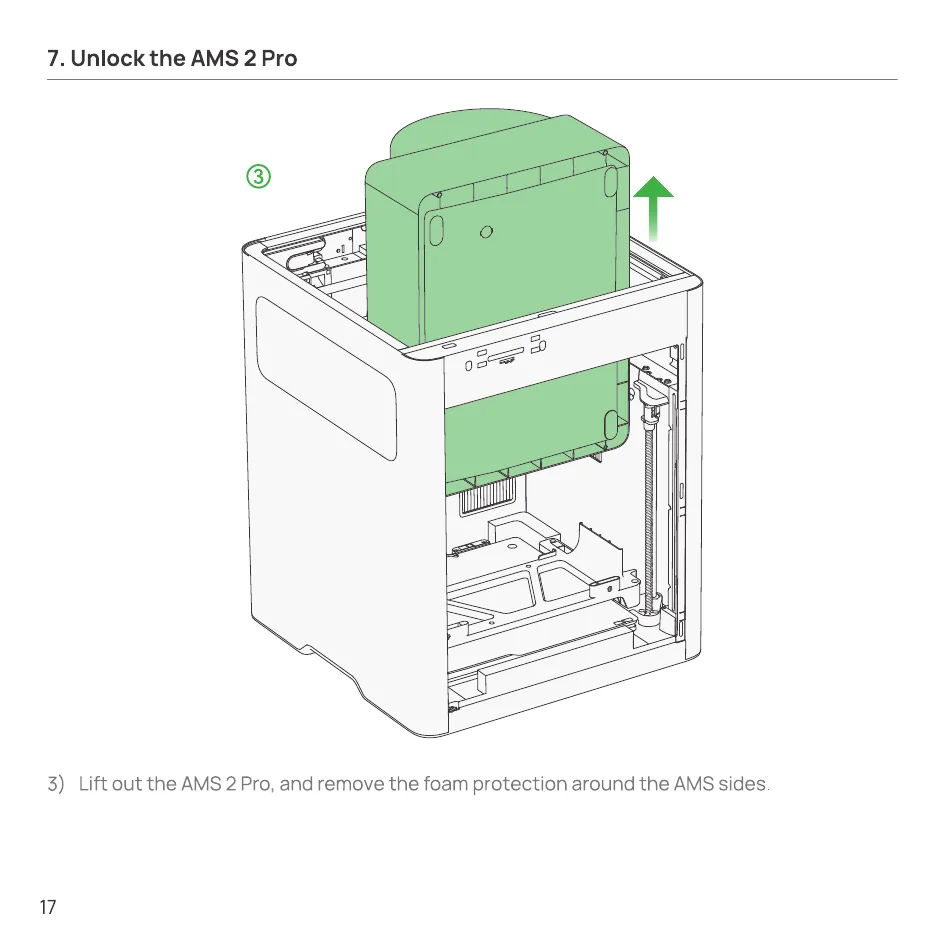
- Lift out the AMS 2 Pro, and remove the foam protection around the AMS sides.
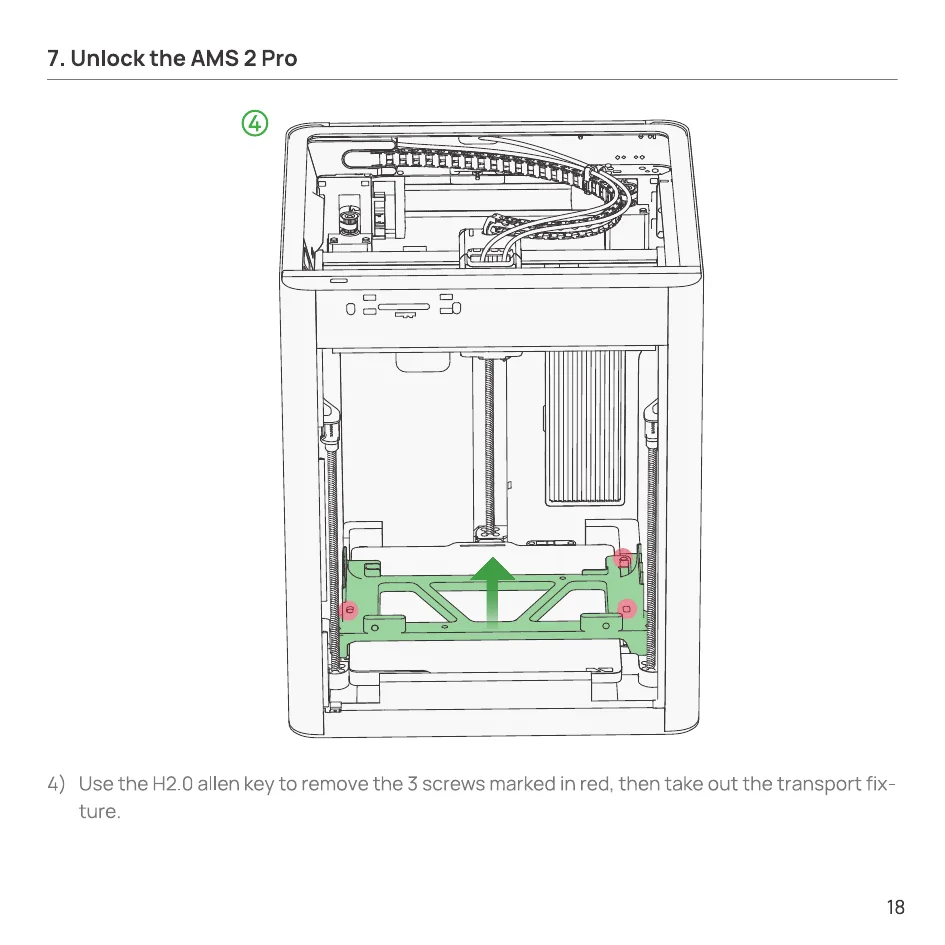
- Use the H2.0 allen key to remove the 3 screws marked in red, then take out the transport fixture.
8. Unlock the Heatbed
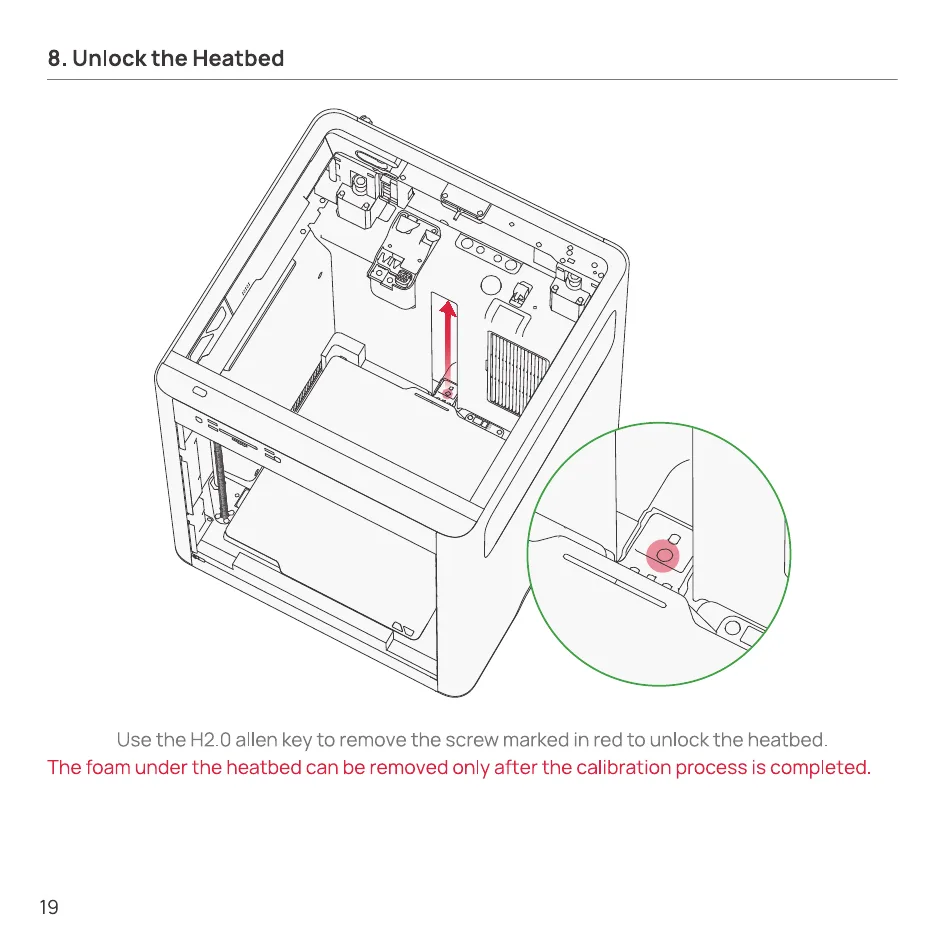
Use the H2.0 allen key to remove the screw marked in red to unlock the heatbed.
9. Remove the Lead Screw Protectors
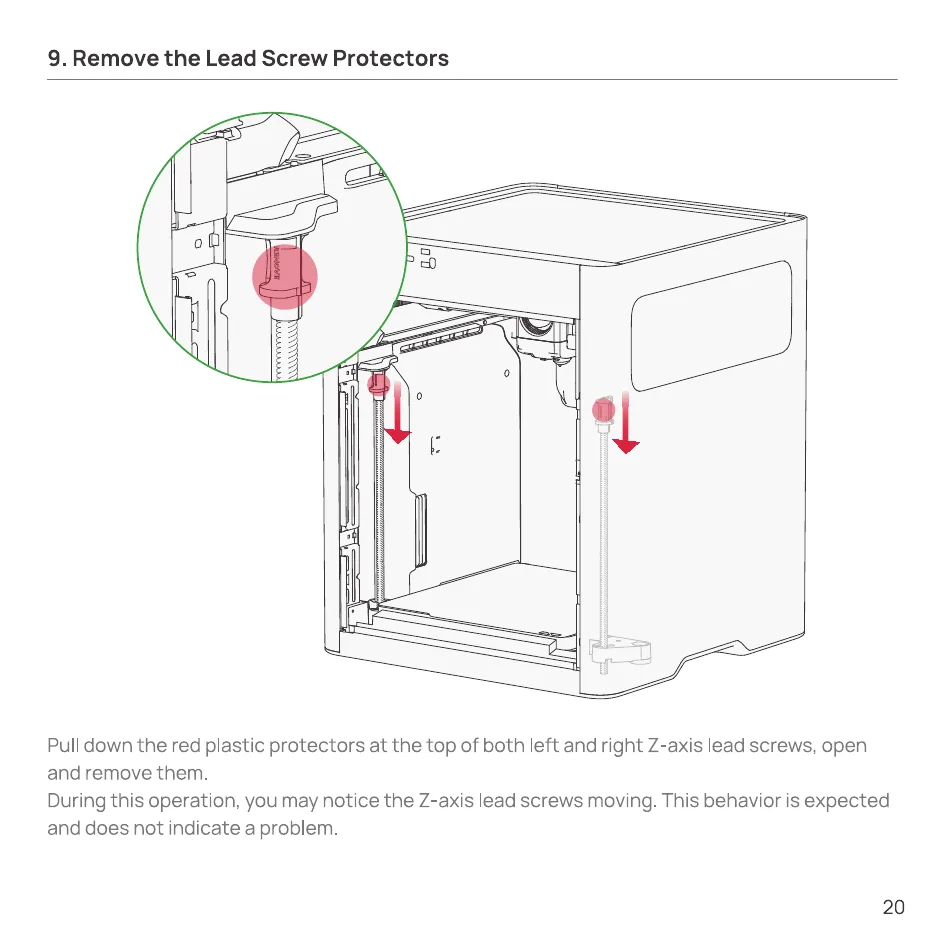
Pull down the red plastic protectors at the top of both left and right Z-axis lead screws, open and remove them.
During this operation, you may notice the Z-axis lead screws moving. This behavior is expected and does not indicate a problem.
10. Unlock the Toolhead
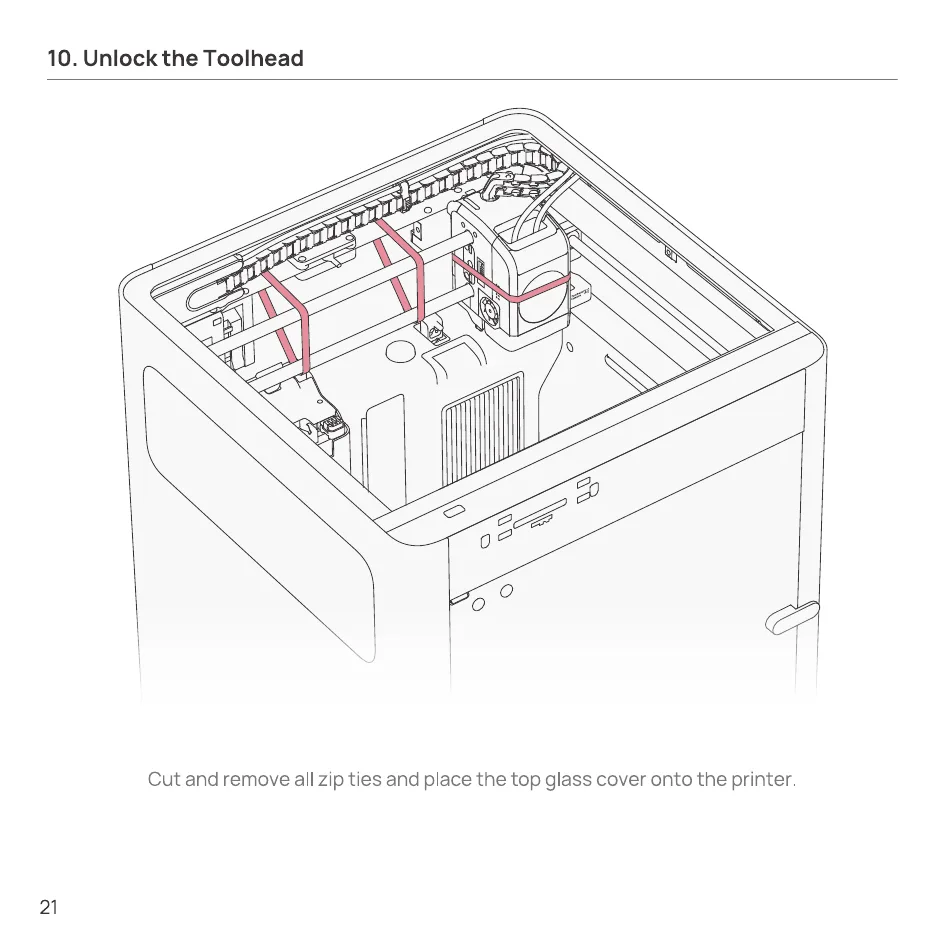
Cut and remove all zip ties and place the top glass cover onto the printer.
11. Install the Touchscreen
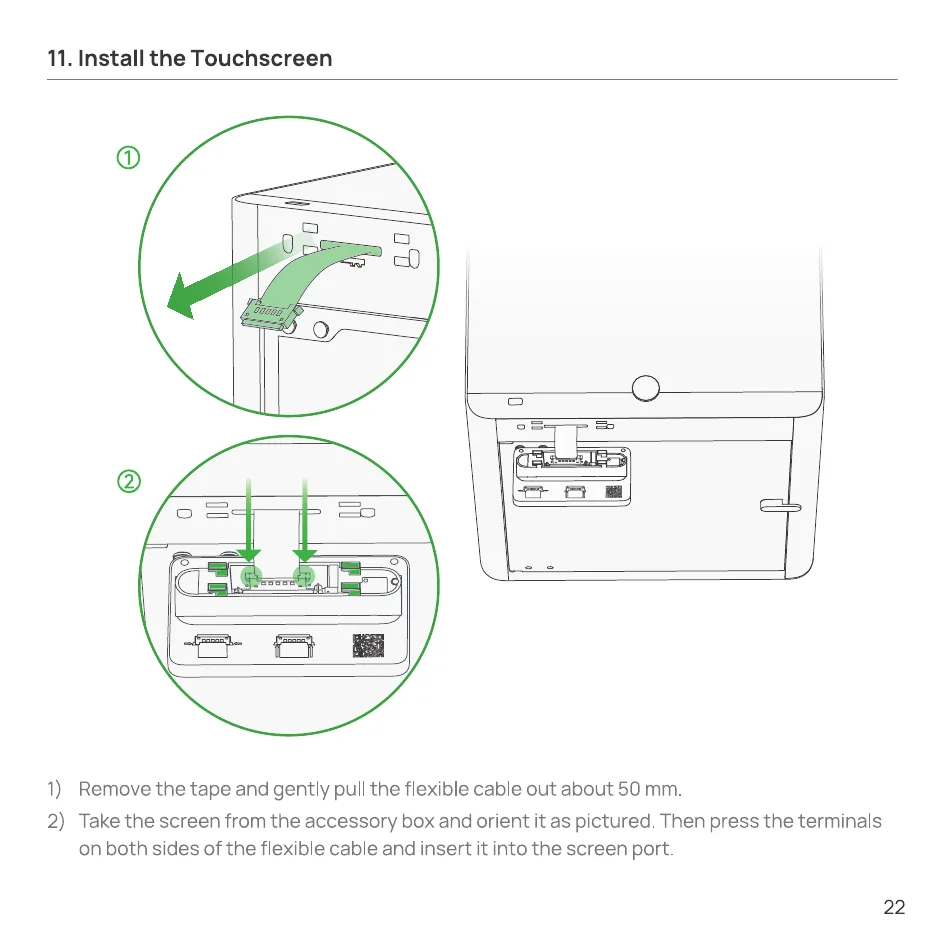
- Remove the tape and gently pull the flexible cable out about 50 mm.
- Take the screen from the accessory box and orient it as pictured. Then press the terminals on both sides of the flexible cable and insert it into the screen port.
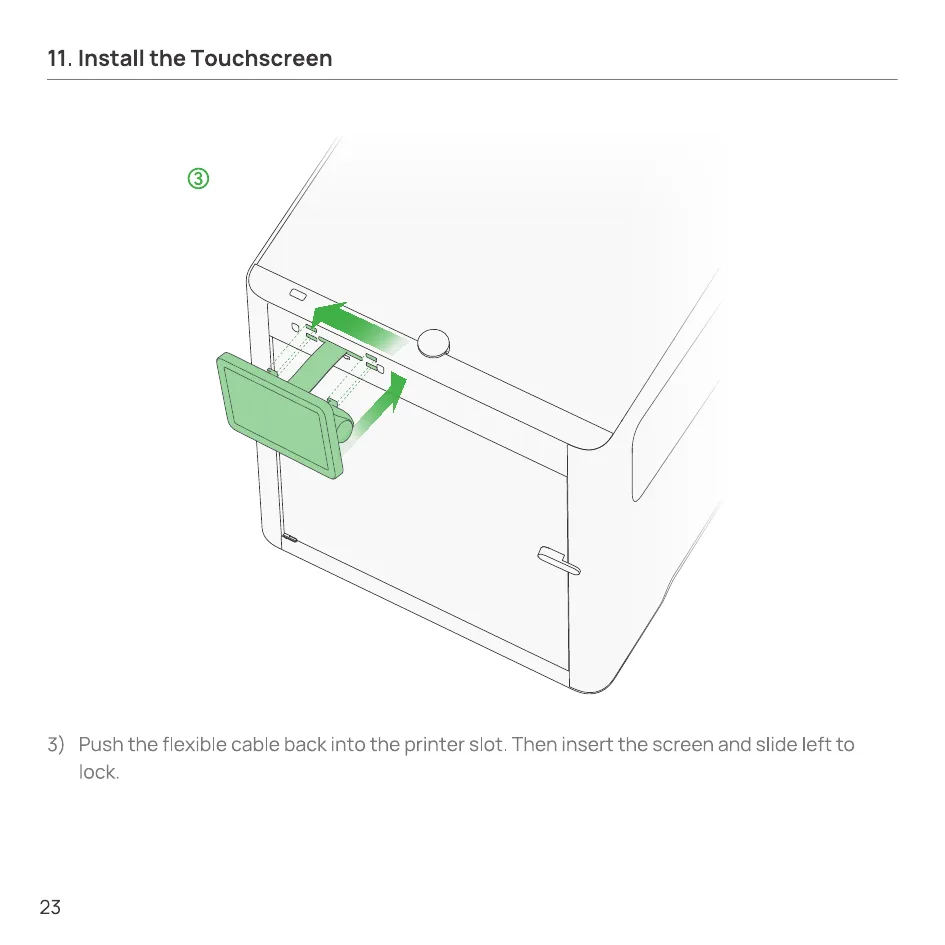
- Push the flexible cable back into the printer slot. Then insert the screen and slide left to lock.
12. Install the Auxiliary Extruder
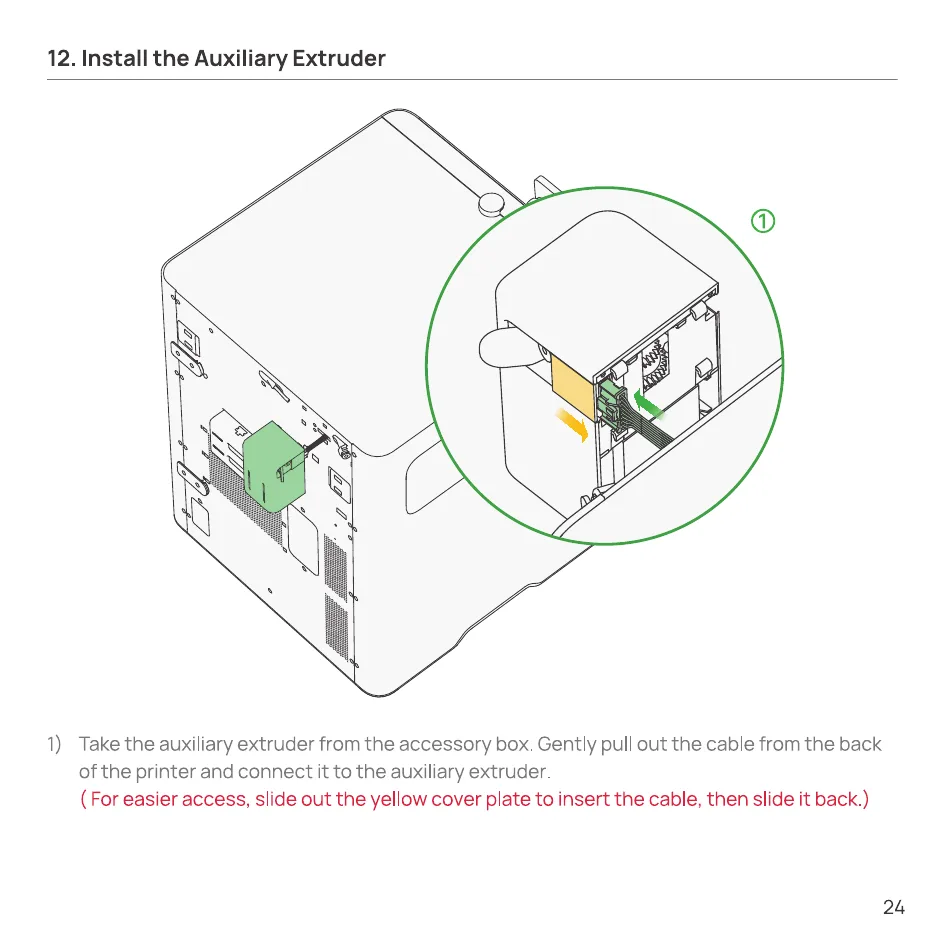
- Take the auxiliary extruder from the accessory box. Gently pull out the cable from the back of the printer and connect it to the auxiliary extruder.
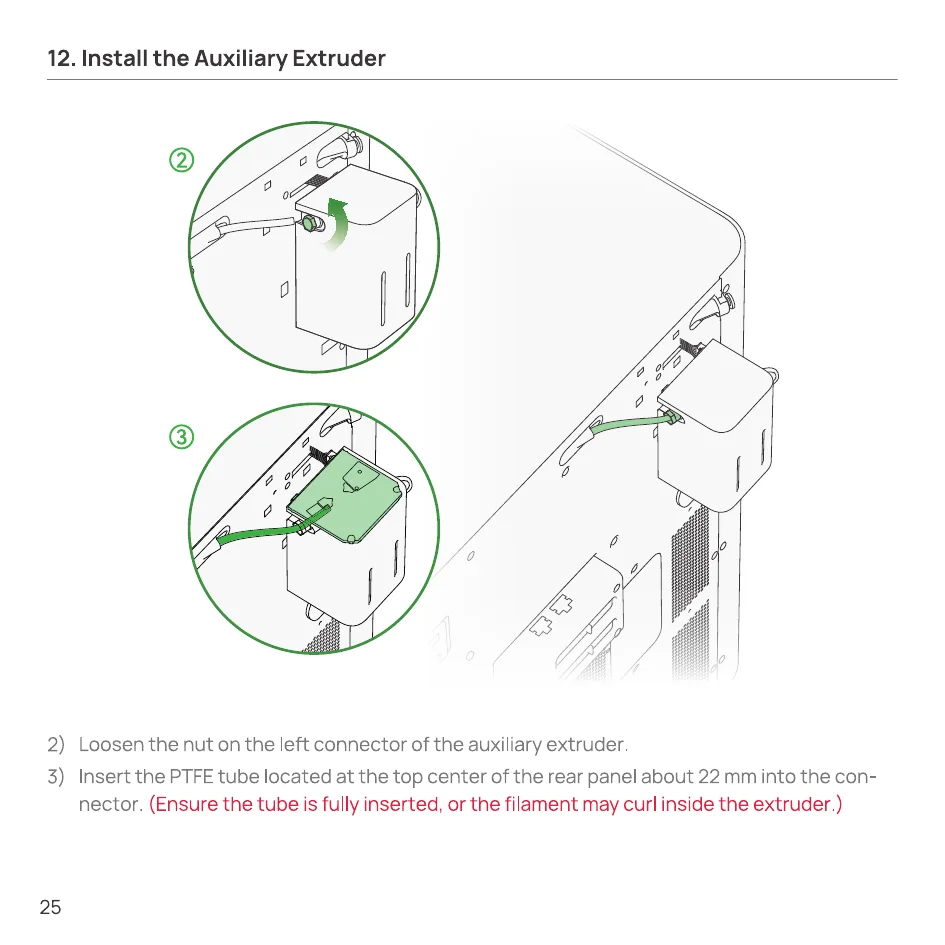
- Loosen the nut on the left connector of the auxiliary extruder.
- Insert the PTFE tube located at the top center of the rear panel about 22 mm into the connector.
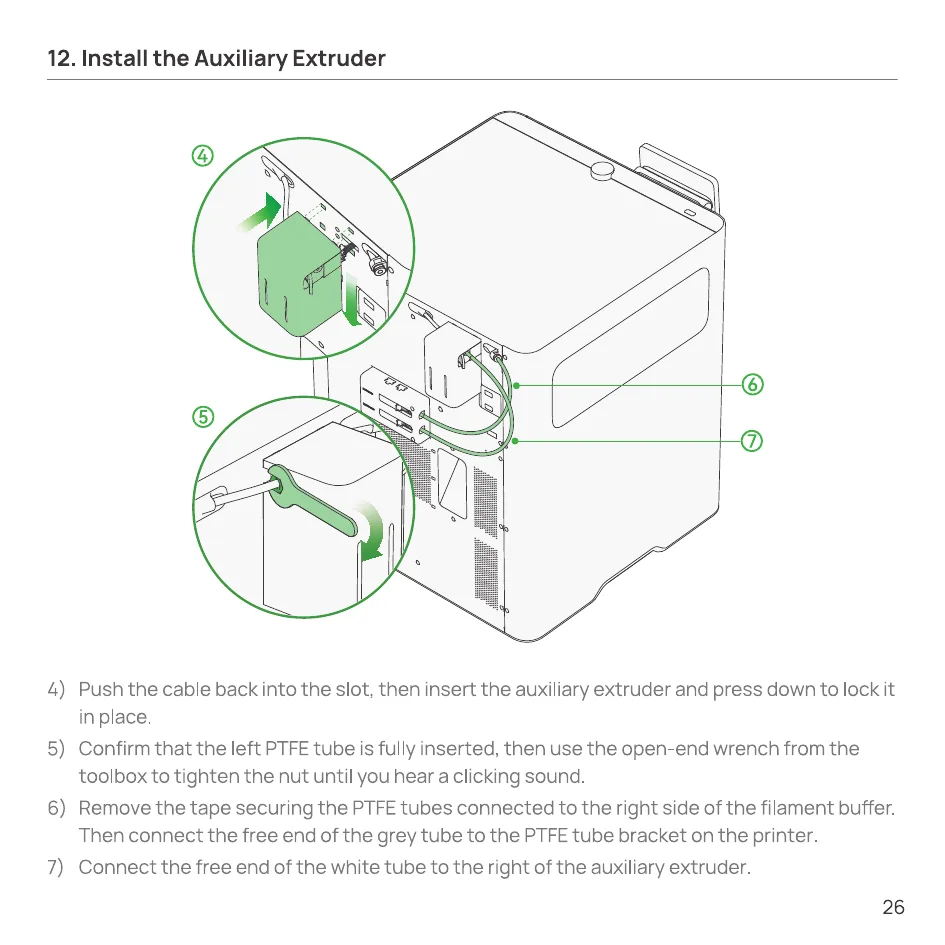
- Push the cable back into the slot, then insert the auxiliary extruder and press down to lock it in place.
- Confirm that the left PTFE tube is fully inserted, then use the open-end wrench from the toolbox to tighten the nut until you hear a clicking sound.
- Remove the tape securing the PTFE tubes connected to the right side of the filament buffer. Then connect the free end of the grey tube to the PTFE tube bracket on the printer.
- Connect the free end of the white tube to the right of the auxiliary extruder.
13. Remove the Desiccant Packaging Material
AMS Combo only
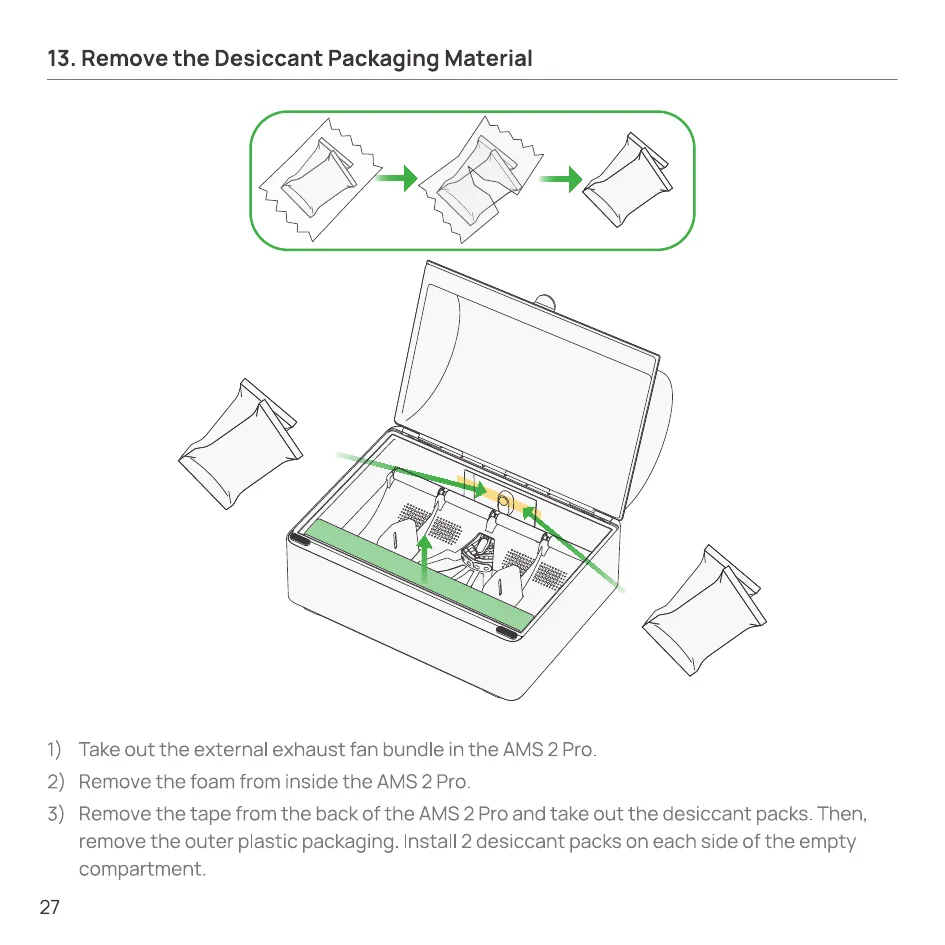
- Take out the external exhaust fan bundle in the AMS 2 Pro.
- Remove the foam from inside the AMS 2 Pro.
- Remove the tape from the back of the AMS 2 Pro and take out the desiccant packs. Then, remove the outer plastic packaging. Install 2 desiccant packs on each side of the empty compartment.
14. Install the AMS 2 Pro
AMS Combo only
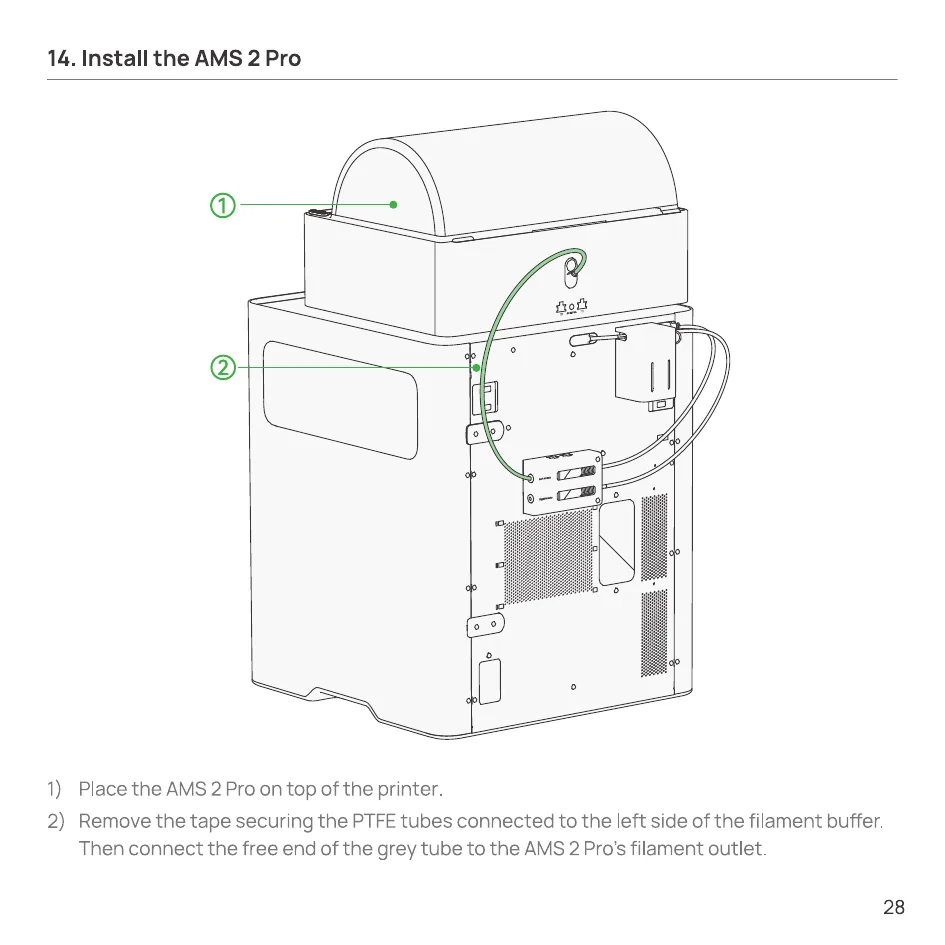
- Place the AMS 2 Pro on top of the printer.
- Remove the tape securing the PTFE tubes connected to the left side of the filament buffer. Then connect the free end of the grey tube to the AMS 2 Pro’s filament outlet.
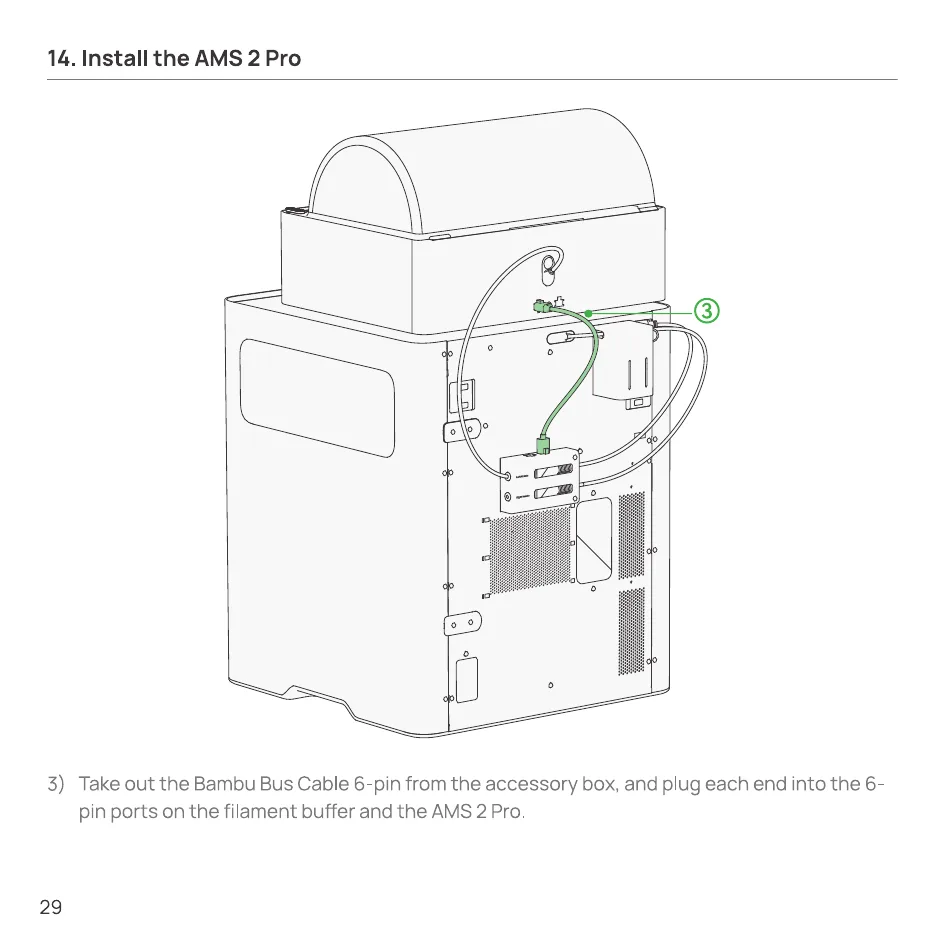
- Take out the Bambu Bus Cable 6-pin from the accessory box, and plug each end into the 6-pin ports on the filament buffer and the AMS 2 Pro.
15. Install the Spool Holder Assembly
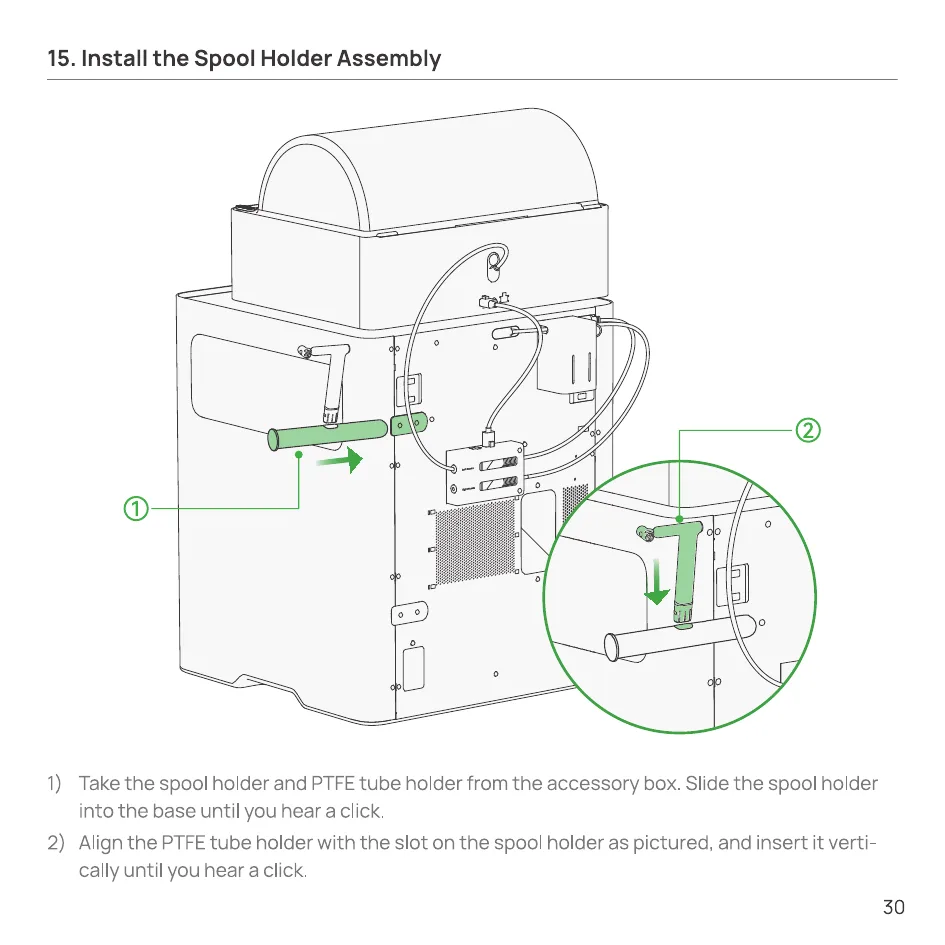
- Take the spool holder and PTFE tube holder from the accessory box. Slide the spool holder into the base until you hear a click.
- Align the PTFE tube holder with the slot on the spool holder as pictured, and insert it vertically until you hear a click.
16. Use the External Spool
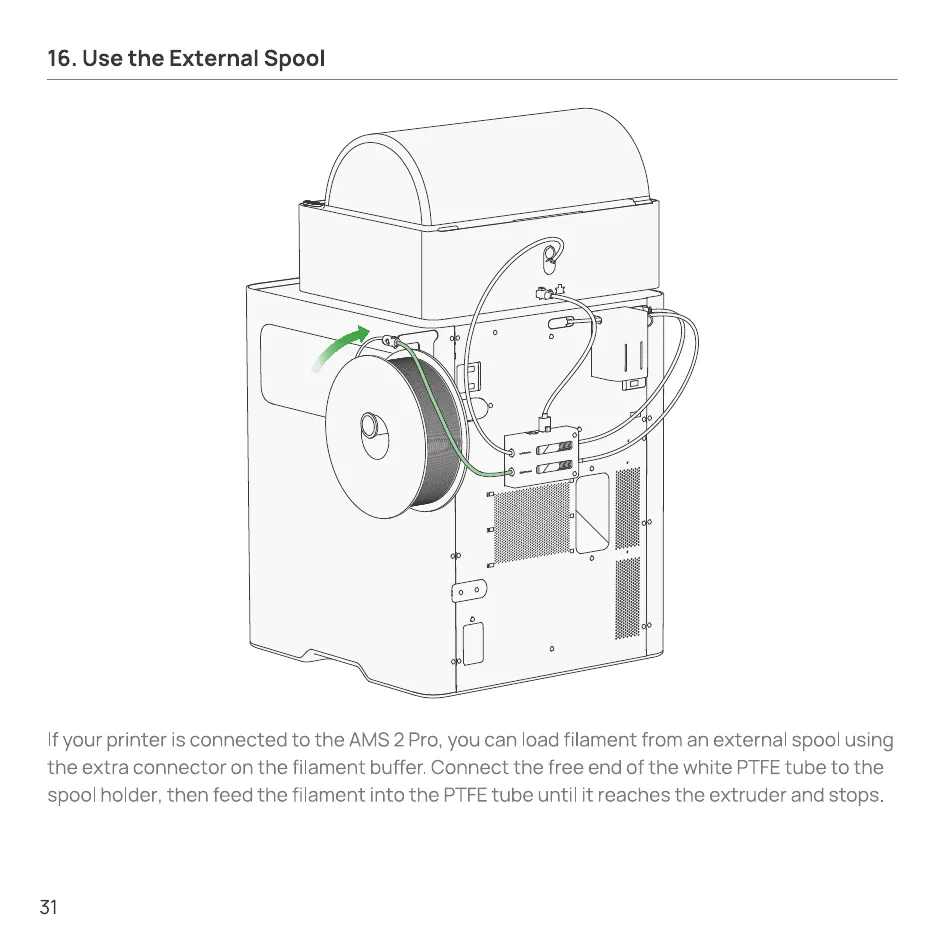
If your printer is connected to the AMS 2 Pro, you can load filament from an external spool using the extra connector on the filament buffer. Connect the free end of the white PTFE tube to the spool holder, then feed the filament into the PTFE tube until it reaches the extruder and stops.
17. Install the External Exhaust Fan Bundle
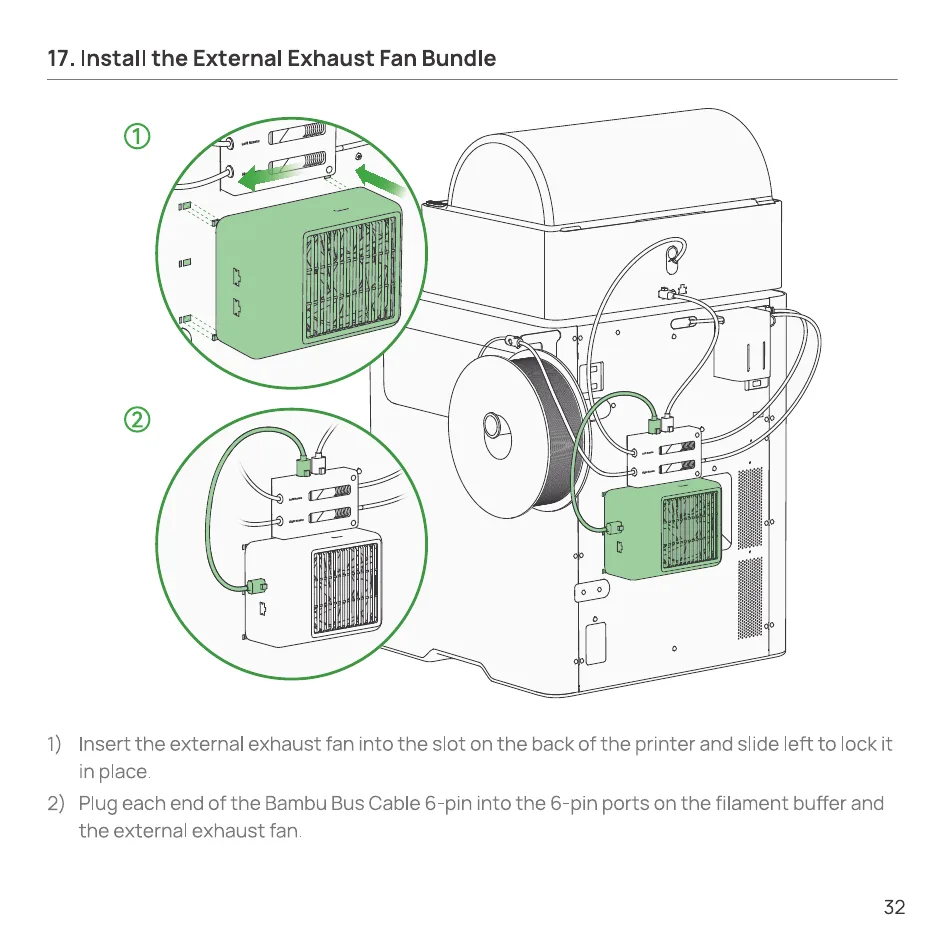
- Insert the external exhaust fan into the slot on the back of the printer and slide left to lock it in place.
- Plug each end of the Bambu Bus Cable 6-pin into the 6-pin ports on the filament buffer and the external exhaust fan.
18. Plug in the Power Cable and Power On
19. Bind the Printer – Bambu Handy
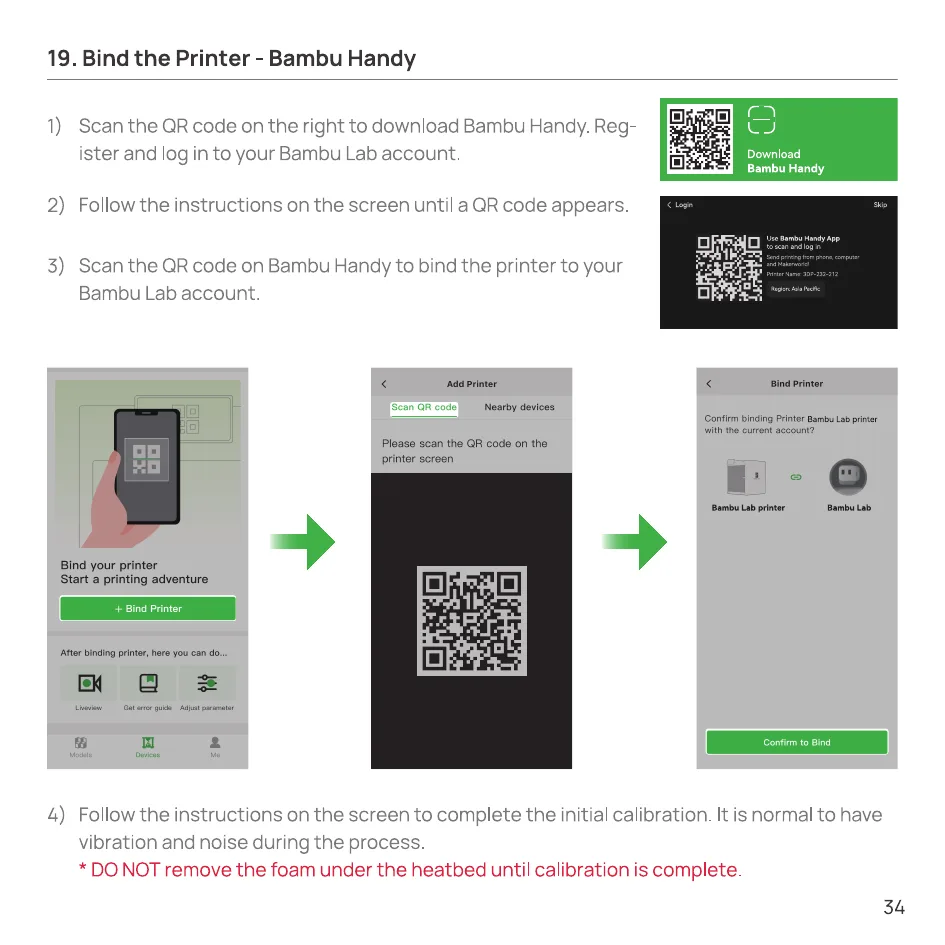
- Scan the QR code on the right to download Bambu Handy. Register and log in to your Bambu Lab account.
- Follow the instructions on the screen until a QR code appears.
- Scan the QR code on Bambu Handy to bind the printer to your Bambu Lab account.
- Follow the instructions on the screen to complete the initial calibration. It is normal to have vibration and noise during the process.
20. Bind the Printer – Bambu Studio
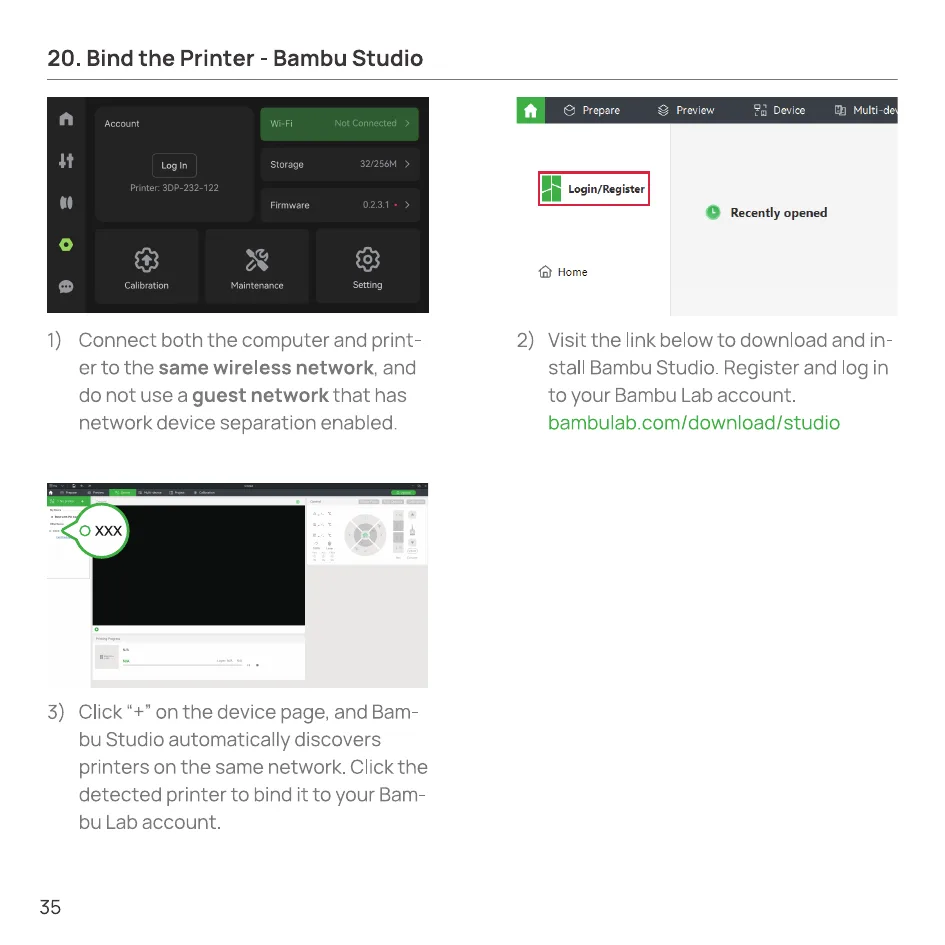
- Connect both the computer and printer to the same wireless network, and do not use a guest network that has network device separation enabled.
- Visit the link below to download and install Bambu Studio. Register and log in to your Bambu Lab account. bambulab.com/download/studio
- Click “+” on the device page, and Bambu Studio automatically discovers printers on the same network. Click the detected printer to bind it to your Bambu Lab account.
21. Load Filament into the AMS 2 Pro
AMS Combo only
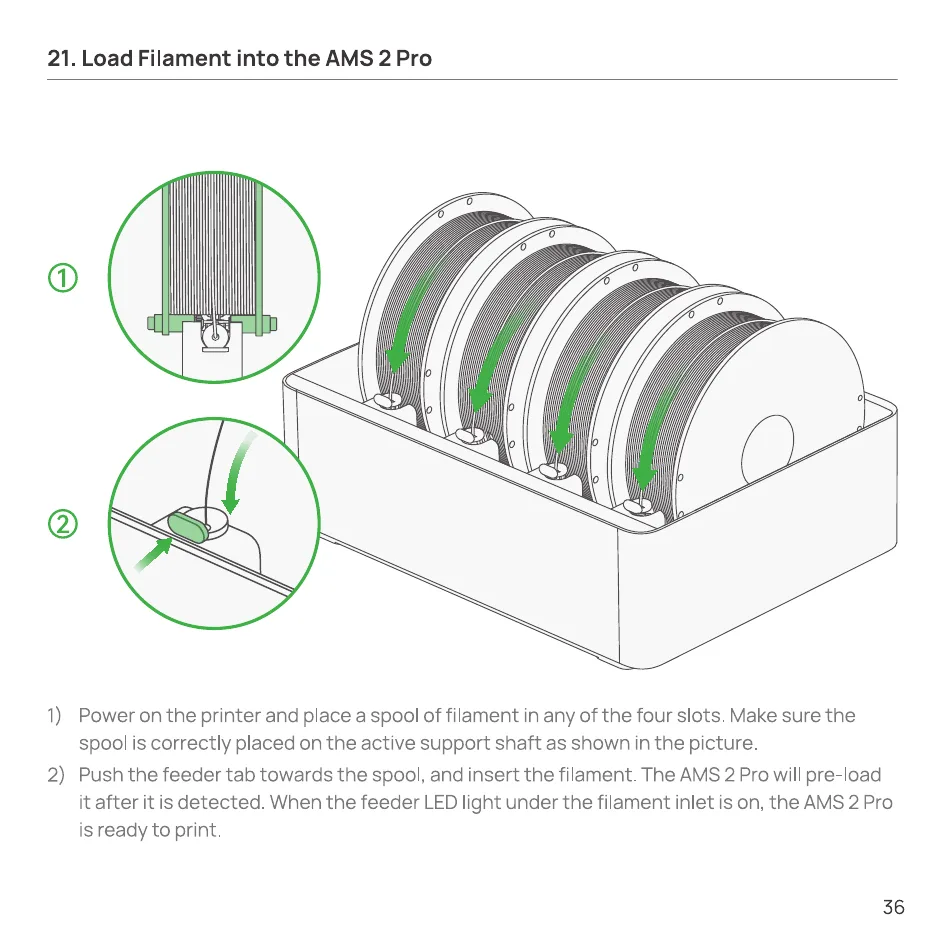
- Power on the printer and place a spool of filament in any of the four slots. Make sure the spool is correctly placed on the active support shaft as shown in the picture.
- Push the feeder tab towards the spool, and insert the filament. The AMS 2 Pro will pre-load it after it is detected. When the feeder LED light under the filament inlet is on, the AMS 2 Pro is ready to print.
22. First Print
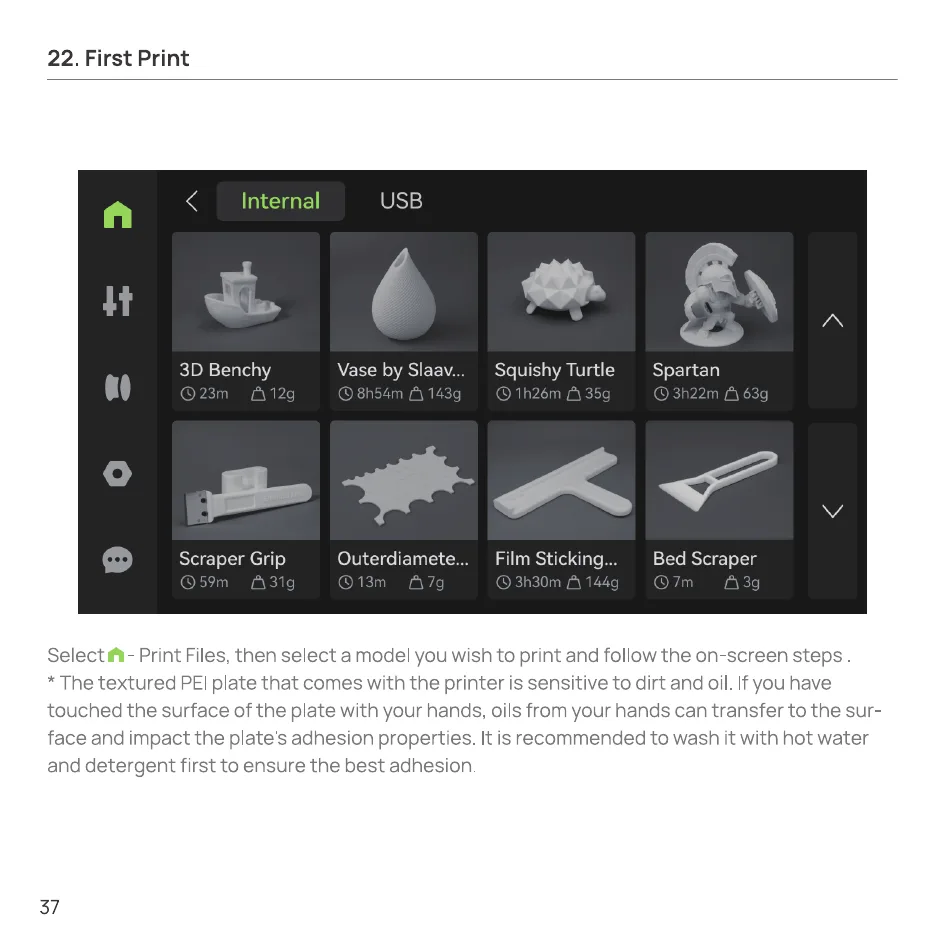
Select Home – Print Files, then select a model you wish to print and follow the on-screen steps.
23. After-Print Notes
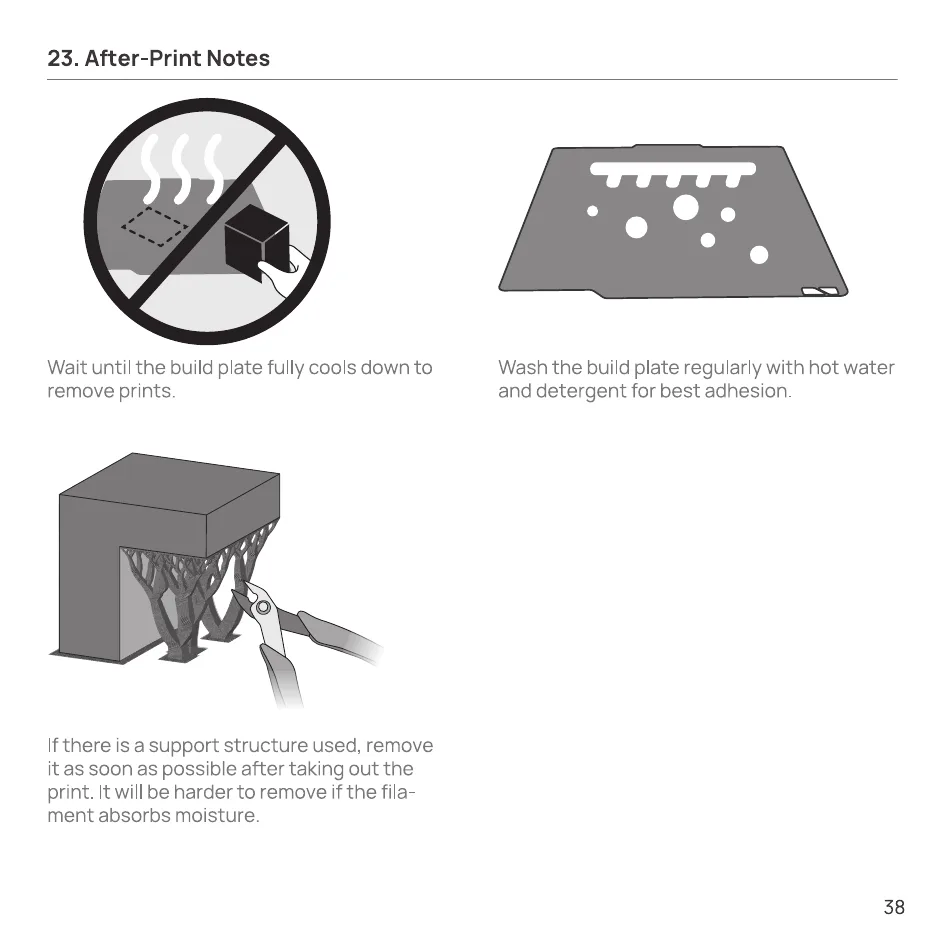
- Wait until the build plate fully cools down to remove prints.
- Wash the build plate regularly with hot water and detergent for best adhesion.
- If there is a support structure used, remove it as soon as possible after taking out the print. It will be harder to remove if the filament absorbs moisture.
24. Regular Maintenance
A 3D printer has a complex mechanical structure and numerous moving parts. Regular maintenance is essential to ensure stable operation and high-quality prints.
Metal Moving Parts:
- Lubricate lead screws, linear rods, idler pulleys, and extruder gears regularly to prevent rust.
- Use lubricating oil for linear rods and idler pulleys, and apply lubricating grease to lead screws and extruder gears.
Consumables:
- Inspect plastic and rubber parts, such as filament cutters, for signs of wear, deformation, or aging.
- Replace consumable parts as needed, such as nozzle wipers and PTFE tubes, to maintain print quality.
Other Components:
- Check camera lenses, fans, and filament sensors for dust or debris.
- Clean fans regularly, and gently clean camera lenses using a microfiber cloth with isopropanol or anhydrous alcohol for optimal clarity.
Please refer to the “Regular Maintenance Recommendations” section on our wiki for more information: bambulab.com/support/x2d/maintenance
25. Printer Specifications
| Printing Technology | |
|---|---|
| Type | Fused Deposition Modeling |
| Body | |
| Build Volume (W*D*H) | Main Nozzle Printing: 256×256×260 mm |
| Chassis | Plastic and Steel |
| Outer Frame | Plastic, Glass, and Metal |
| Dimensions and Weight | |
| Physical Dimensions | 392×406×478 mm |
| Net Weight | 16.25 kg |
| Toolhead | |
| Extruder Gear | Hardened Steel |
| Nozzle | Hardened Steel |
| Max Nozzle Temperature | 300 °C |
| Included Nozzle Diameter | 0.4 mm |
| Supported Nozzle Diameter | 0.2 mm, 0.4 mm, 0.6 mm, 0.8 mm |
| Filament Cutter | Built-in |
| Filament Diameter | 1.75 mm |
| Extruder Motor | Bambu Lab High-precision Permanent Magnet Synchronous Motor |
| Auxiliary Extruder | |
| Extruder Gear | Hardened Steel |
| Extruder Motor | Stepper Motor |
| Heatbed | |
| Build Plate Material | Flexible Steel Plate |
| Included Build Plate Type | Textured PEI Plate |
| Supported Build Plate Type | Textured PEI Plate, Smooth PEI Plate, Cool Plate SuperTack, Engineering Plate |
| Max Heatbed Temperature | 120 °C |
| Speed | |
| Max Speed of Toolhead | 1,000 mm/s |
| Max Acceleration of Toolhead | 20,000 mm/s² |
| Max Flow for Hotend | 40 mm³/s (Test parameters: 250 mm round model with a single outer wall; Bambu Lab ABS; 280 °C printing temperature) |
| Chamber Temperature Control | |
| Active Chamber Heating | Supported |
| Max Temperature | 65 °C |
| Air Purification | |
| Pre-filter Grade | G3 |
| HEPA Filter Grade | H12 |
| Activated Carbon Filter Type | Granulated Coconut Shell |
| VOC Filtration | Supported |
| Particulate Matter Filtration | Supported |
| Cooling | |
| Part Cooling Fan | Closed Loop Control |
| Hotend Cooling Fan | Closed Loop Control |
| Main Control Board Fan | Closed Loop Control |
| Chamber Heat Circulation Fan | Closed Loop Control |
| Auxiliary Part Cooling Fan | Closed Loop Control |
| External Exhaust Fan | Closed Loop Control |
| Filament Supported (Main Hotend) | |
| Type | PLA, PETG, ABS, ASA, TPU, Support for PLA, Support for PLA/PETG, Support for ABS, Support for PA/PET, PET, PA, PC, PVA; Carbon/Glass Fiber Reinforced PLA, PETG, ABS, ASA, PA6, PAHT, PPA, PET |
| Filament Supported (Auxiliary Hotend) | |
| Type | PLA (excluding PLA Aero), PETG, ABS, ASA, TPU for AMS, Support for PLA, Support for PLA/PETG, Support for ABS, Support for PA/PET, PET, PA, PC, PVA; Carbon/Glass Fiber Reinforced PLA, PETG, ABS, ASA, PA6, PAHT, PET |
| Print with Caution1) | PLA Silk, PETG-CF, ASA-CF, PA6-CF, TPU for AMS, Support for PA/PET |
| Sensor | |
| Live View Camera | Built-in; 1920×1080 |
| Toolhead Camera | Built-in; 1600×1200 |
| Door Sensor | Supported |
| Filament Run Out Sensor | Supported |
| Filament Tangle Sensor | Supported |
| Filament Odometry | Supported with AMS |
| Power Loss Recovery | Supported |
| Electrical Requirements2) | |
| Voltage | High-voltage version: 200-240 VAC, 50/60 Hz Low-voltage version: 100-120 VAC, 50/60 Hz |
| Max Power3) | High-voltage version: 1600 W@220 V Low-voltage version: 1100 W@110 V |
| Steady-State Power | High-voltage version: |
| Environment Requirements | |
| Operating Temperature | 10 °C-30 °C |
| Electronics | |
| Touchscreen | 5-inch 1280×720 Touchscreen |
| Storage | Built-in 8 GB EMMC and USB Port |
| Control Interface | Touchscreen, mobile App, PC App |
| Motion Controller | Dual-core Cortex-M4 and Single-core Cortex-M7 |
| Application Processor | Quad-core ARM with dedicated NPU |
| Software | |
| Slicer | Bambu Studio Supports third-party slicers which export standard G-code, such as Super Slicer, PrusaSlicer and Cura, but certain advanced features may not be supported. |
| Supported Operating System | MacOS, Windows, Linux |
| Network Control | |
| Ethernet | Not Available |
| Wireless Network | Dual-Band Wi-Fi |
| Network Kill Switch | Not Available |
| Removable Network Module | Not Available |
| 802.1X Network Access Control | Not Available |
| Wi-Fi | |
| Operating Frequency | 2412 - 2472 MHz, 5150 - 5850 MHz (FCC/CE) 2400 - 2483.5 MHz, 5150 - 5850 MHz (SRRC) |
| Wi-Fi Transmitter Power (EIRP) | 2.4 GHz: <23 dBm (FCC); <20 dBm (CE/SRRC/MIC) |
| Wi-Fi Protocol | IEEE 802.11 a/b/g/n |
26. AMS 2 Pro Specifications
AMS Combo only
| Body | |
|---|---|
| Dimensions | 372×280×226 mm |
| Net Weight | 2.5 kg |
| Housing | ABS/PC |
| Printing | |
| Filament Supported | PLA, PETG, ABS, ASA, PET, PA, PC, PVA (dried), BVOH (dried), PP, POM, HIPS, Bambu PLA-CF/PAHT-CF/PETG-CF/Support for PLA/PETG, and TPU for AMS |
| Filament Not Supported | TPE, generic TPU, PVA (damp), BVOH (damp), Bambu PET-CF/TPU 95A, and other brands of filament that contain carbon fiber or glass fiber |
| Filament Diameter | 1.75 mm |
| Spool Dimension | Width: 50-68 mm Diameter: 197-202 mm |
| RFID Identification | Supported |
| Drying | |
| Maximum Drying Temperature | 65 °C |
| Filament Supported | PLA, PETG, Support for PLA/PETG, ABS*, ASA*, PET*, PA*, PC*, PVA*, BVOH*, PP, POM*, HIPS*, Bambu PLA-CF*/PAHT-CF*/PETG-CF*, and TPU for AMS* |
| Active Moisture Discharge | Supported |
| Sealed Storage | Supported |
| Temperature and Humidity Detection and Maintenance | Supported. Real-time temperature and humidity can be displayed on the screen, Bambu Studio, and Bambu Handy. |
| Power | |
| Input | 24 V 4 A |
27. Technical Support
If you need technical support, please follow any of the following methods:
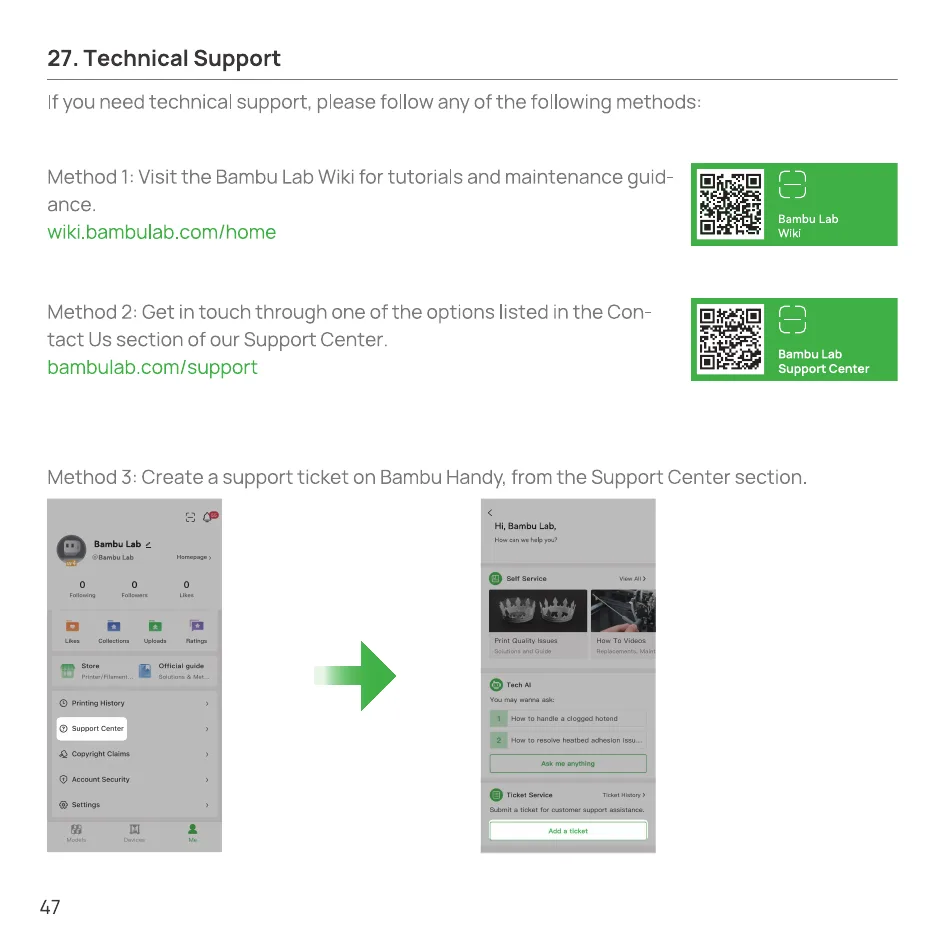
- Method 1: Visit the Bambu Lab Wiki for tutorials and maintenance guidance. wiki.bambulab.com/home
- Method 2: Get in touch through one of the options listed in the Contact Us section of our Support Center. bambulab.com/support
- Method 3: Create a support ticket on Bambu Handy, from the Support Center section.
For more information, visit www.bambulab.com. (Document A00291-08)