
Introduction
Source: X2D 3D Printing User Manual · v1.0 · 2026.05 · p. 11–21
1.1 Product Overview
The X2D is an intelligent 3D printer based on Fused Deposition Modeling (FDM) technology. This model features an innovative dual-extruder system with two separately designed extruders: the auxiliary extruder provides strong thrust to support long-distance filament feeding, while reducing the toolhead load and improving motion performance. It maintains a compact size while ensuring ample print area. The dual hotend design significantly enhances material change efficiency and reduces filament waste.
The X2D also offers the following features to provide a smarter printing experience, making your creativity more efficient and diverse.
- Smooth user experience: The 5-inch touchscreen and second-generation UI provide smoother interaction, while the quick-release hotend design makes routine maintenance and replacement easier.
- Stable support for engineering materials: With a nozzle temperature of up to 300 ℃, a heatbed temperature of up to 120 ℃, and an adaptive airflow system that actively heats the chamber up to 65 ℃, the printer reliably supports a wide range of printing needs, from basic to engineering-grade filaments.
- Intelligent detection and comprehensive calibration: The self-developed extruder motor works with the filament buffer to provide dual filament-tangle detection, while multiple cameras and sensors enable a wide range of smart detection and calibration features.
When used with the Automatic Material System (AMS), it further enhances printing intelligence and ease of use:
- AMS 2 Pro: supports RFID filament sync, automatic multi-color/multi-material changing, and smart drying. Enhances multi-material printing and filament management for a smarter, more convenient, and improved printing experience.
- AMS HT: specialized for high-temperature filaments, the AMS HT supports RFID filament sync, automatic multi-color/multi-material changing, and smart drying, meeting the demands of engineering-grade and professional printing.
Optional upgrade accessories can be used to further improve printing automation and reduce manual operations:
- Filament track switch: supports any mapping between AMS and the two hotends, allowing flexible delivery of filament from AMS to any target hotend, avoiding manual intervention in filament-saving mode.
- TPU feed assist module: allows filament to be fed directly through the module’s inlet while the printer remains enclosed, simplifying TPU print preparation and loading while reducing feeding resistance regardless of spool placement.
1.2 Printer Component Introduction
1.2.1 Printer
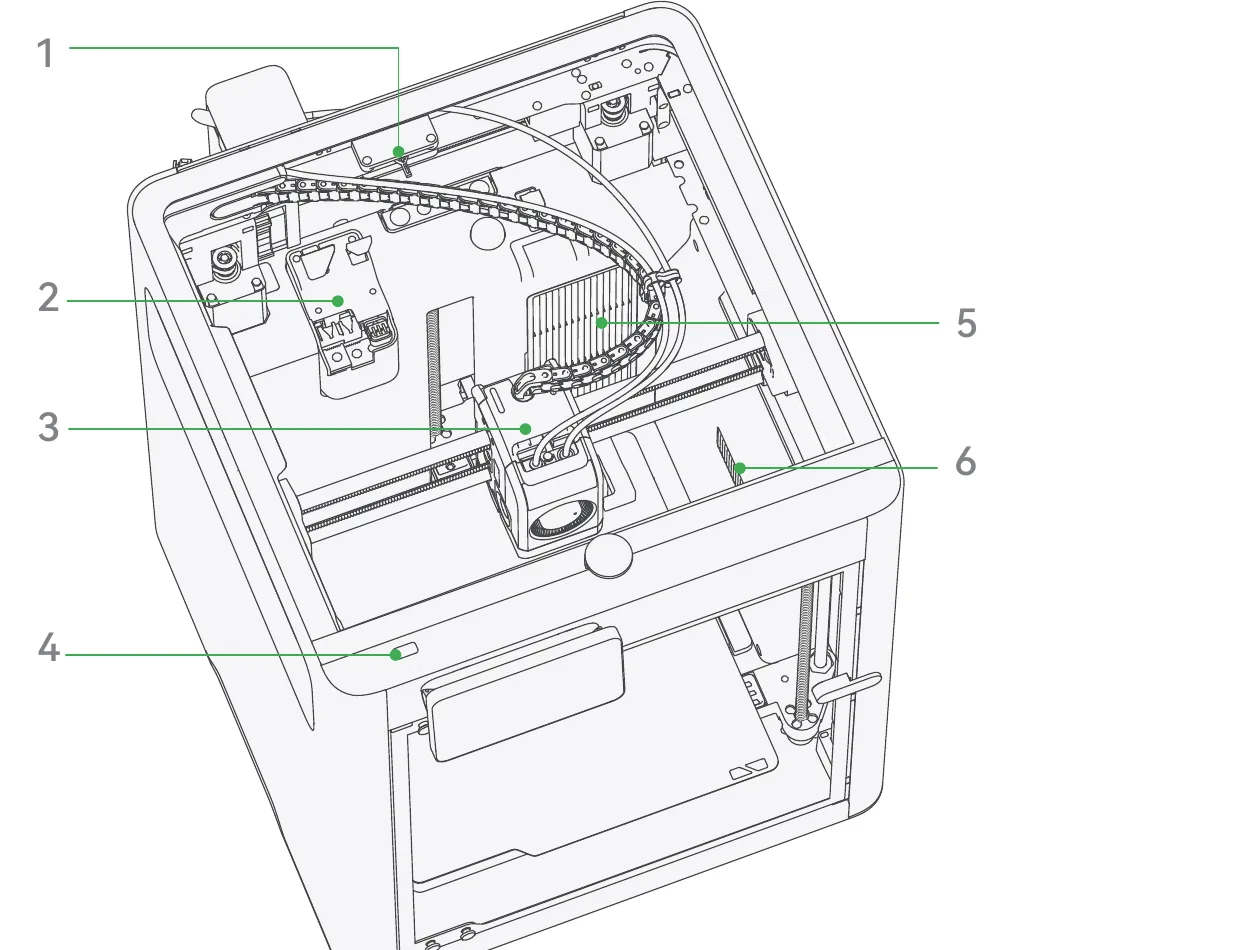
- Filament cutter stopper: Inserts into the toolhead to activate the left and right filament cutters to cut the filaments.
- Purge wiper: Comprises the purge wiper part and nozzle wiping pad. It cleans and collects excess extruded filament to keep the print surface clean and smooth.
- Toolhead: Contains the main extruder. It precisely extrudes and heats filament, depositing melted filament layer by layer on the build plate.
- USB port: Insert a USB drive to print model files offline and store recordings and timelapse files.
- Air filter: Air inside the chamber passes through an activated carbon filter before being vented, helping reduce particle and odor emissions.
- Adaptive airflow switching unit: In strong cooling mode, it draws in external cool air to lower the printing environment temperature. In heating mode, it works with the air filter to form an internal air circulation.
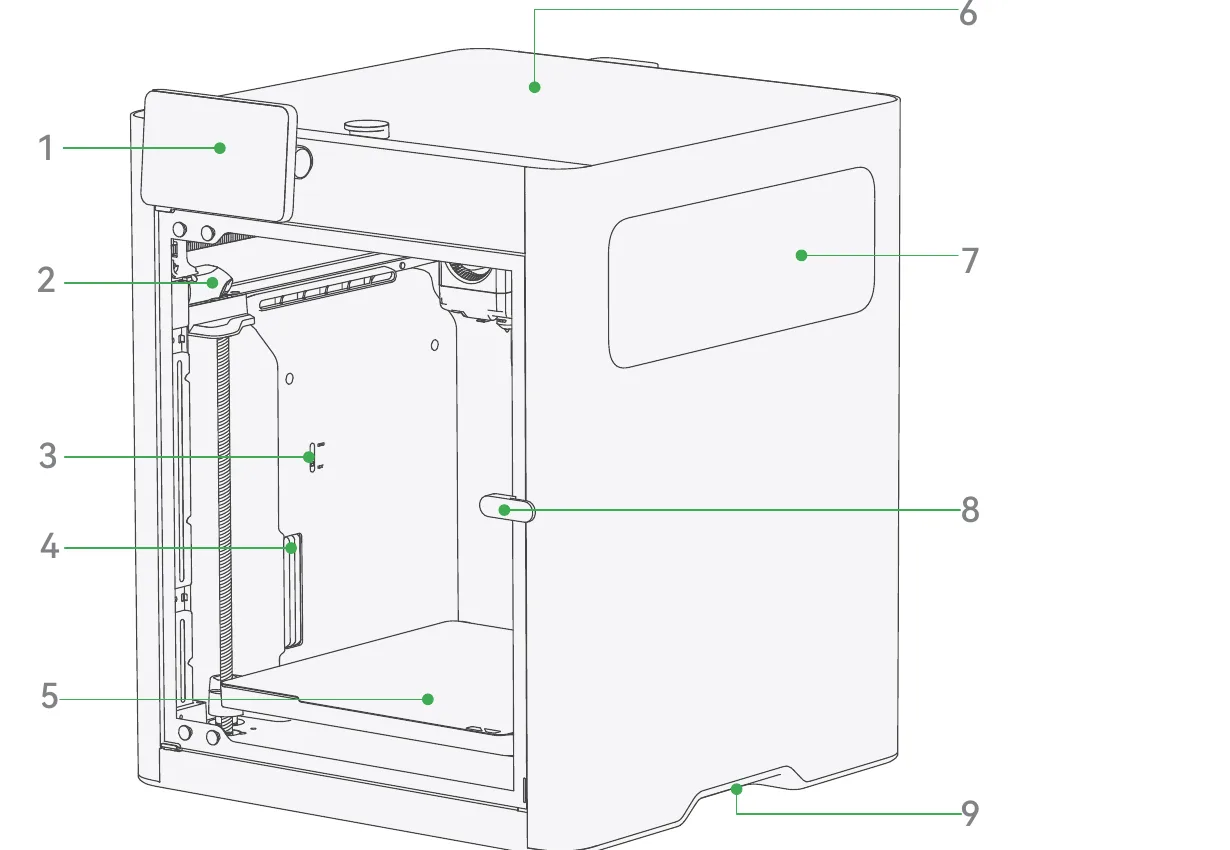
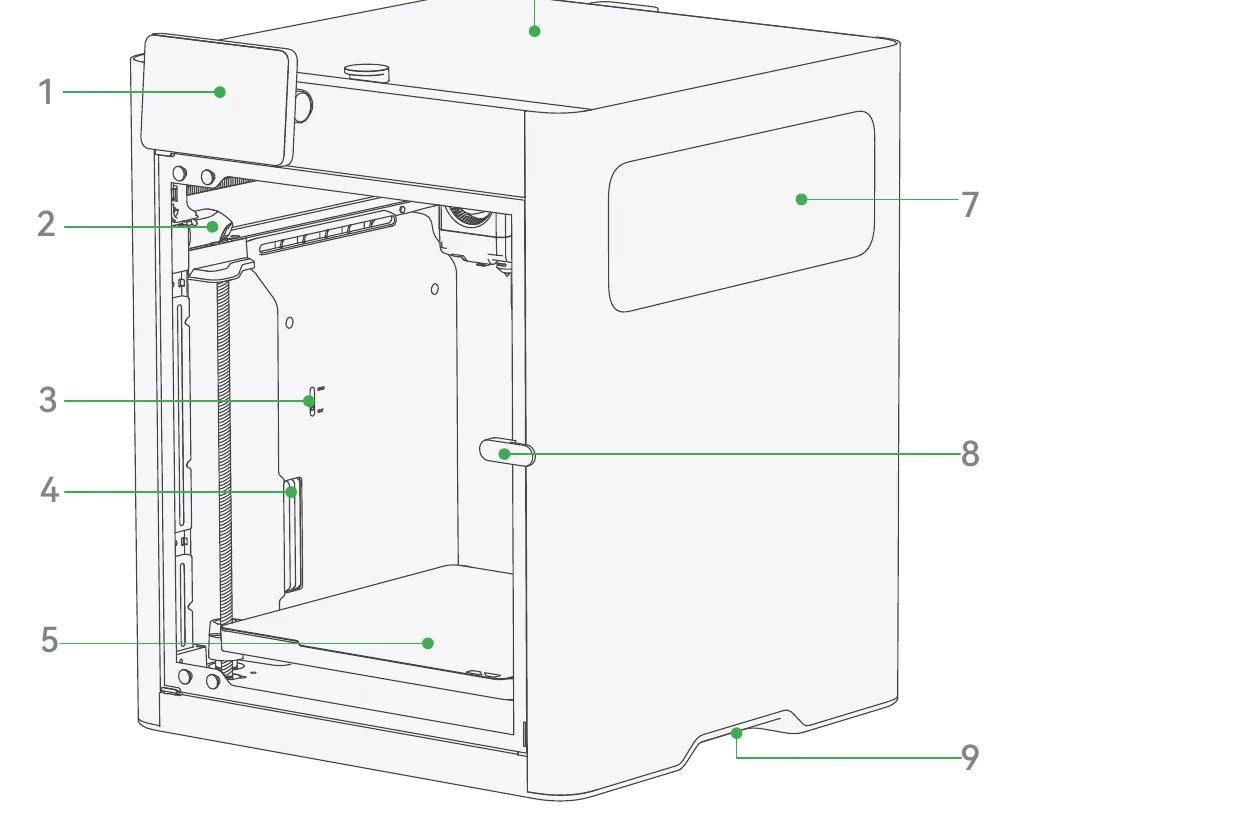
- Touchscreen: Displays printing parameters and controls the printer.
- Live view camera*: Monitors print progress in real time and is used for timelapse recording and AI vision detection.
- Circulation mode indicator: Automatically switches based on the air management mode without manual adjustment.
- Chamber heater unit: In heating mode, it raises and maintains the chamber temperature. In strong cooling mode, it draws external cool air to lower the printing environment temperature.
- Heatbed: Heats the print surface to ensure stable adhesion of printed layers to the build plate, preventing warping or detachment.
- Top glass cover: Allows observation of print progress during printing. It provides good sealing and safety and can also be used to place AMS.
- Side window: Allows observation of print progress from both left and right sides during printing.
- Front door: Keeps the printer enclosed and helps maintain chamber temperature during high-temperature printing. It also allows observation of print progress.
- External air intake (lift handle): In strong cooling mode, it draws in external air through the intake to lower the chamber temperature. Use this position to lift the printer for safe handling.
- Belt tensioner: Adjusts and monitors belt tension. It sends data to the system to ensure printing accuracy and motion stability.
- Spool holder base: Secures the spool holder to allow placement of an external spool.
- Power socket and switch: Connect the printer to an AC outlet using the included power cord. Turn on the switch to power the printer.
- Main extruder PTFE tube bracket: Filament enters the printer through this port and moves to the toolhead’s main hotend.
- Auxiliary extruder PTFE tube bracket: Filament enters the auxiliary extruder through this port and is then pushed to the toolhead’s auxiliary hotend.
- Auxiliary extruder: Independently extrudes filament for the auxiliary hotend, pushing filament from the filament buffer to the toolhead.
- Bambu Bus port 6-pin: Connect AMS devices and external exhaust fans to the printer using the included Bambu Bus cable 6-pin to ensure proper communication.
- Filament buffer: Reduces tension fluctuations during filament load to ensure smooth feeding.
- The top includes two Bambu Bus ports 6-pin for data transmission to the AMS and external exhaust fan.
- The left side has two filament inlets to connect the AMS and the external spool for filament feeding. The upper inlet transports filament to the main hotend, the lower inlet to the auxiliary hotend.
- Purge chute: Connects to the printer’s internal purge wiper, allowing waste material created during printing to be discharged from the chamber.
- Ventilation holes: Assist in expelling hot air from the chamber during strong cooling mode.
- Exhaust fan: Installed on the printer’s back panel, it contains a filter that cleans the internal hot air before exhausting it from the chamber.
1.2.2 Toolhead
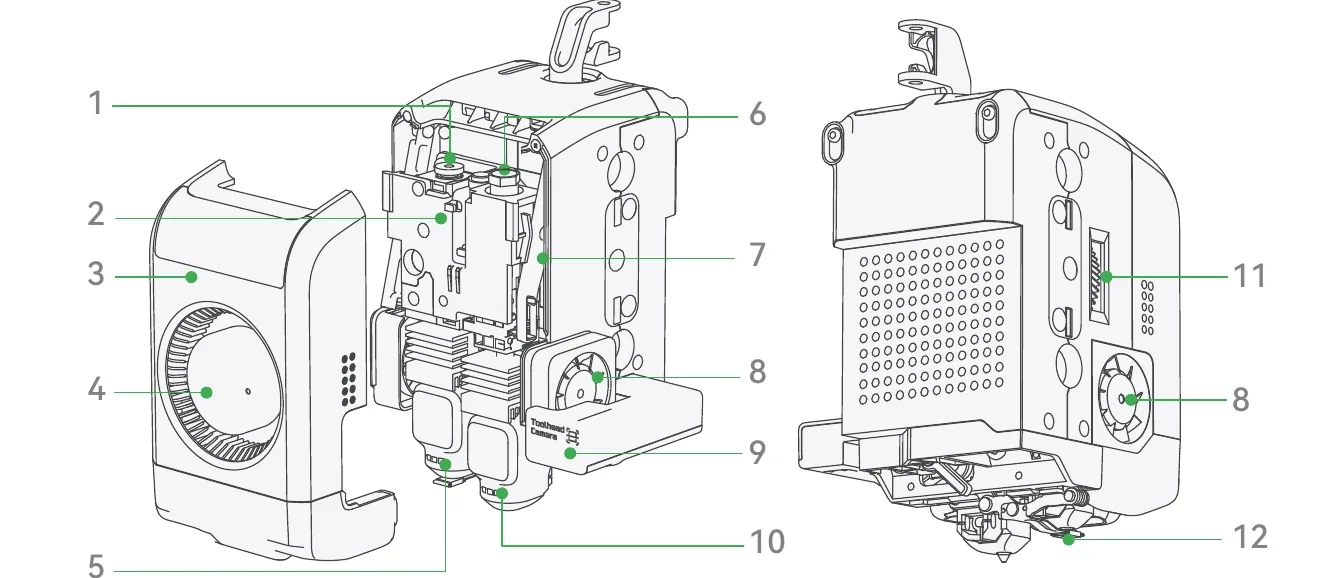
- Main hotend toolhead filament inlet: The filament enters the main extruder and main hotend through this inlet.
- Main extruder: Grips and pushes filament into the main hotend. Precisely controls filament extrusion and retraction length.
- Toolhead front cover: Protects the front of the toolhead to prevent dust or debris entry.
- Part cooling fan: Directs cooling airflow near the hotend nozzle to quickly cool the printed layers.
- Main hotend: Heats and melts the filament, then extrudes it through the nozzle.
- Auxiliary hotend toolhead filament inlet: Filament enters the auxiliary extruder through this inlet and is then pushed to the auxiliary hotend.
- Filament cutter lever: During the unloading process, it drives the left/right filament cutter to cut the filament for the corresponding hotend.
- Cooling fan for hotend: Stabilizes hotend temperature to prevent clogging caused by overheating.
- Toolhead camera: Used for motion accuracy calibration, high-precision nozzle offset calibration, and build plate identification code recognition.
- Auxiliary hotend: Heats and melts filament, then extrudes it through the nozzle. It moves up and down with the nozzle switching lever to switch between the two hotends.
- Main extruder gear: Made of hardened steel, including drive and driven wheels. Precisely pushes the filament under the drive of the extruder motor.
- Flow blocker: A black flap located below the nozzle that prevents molten filament inside the idle nozzle from dripping onto the model or build plate.
1.3 AMS 2 Pro Component Introduction
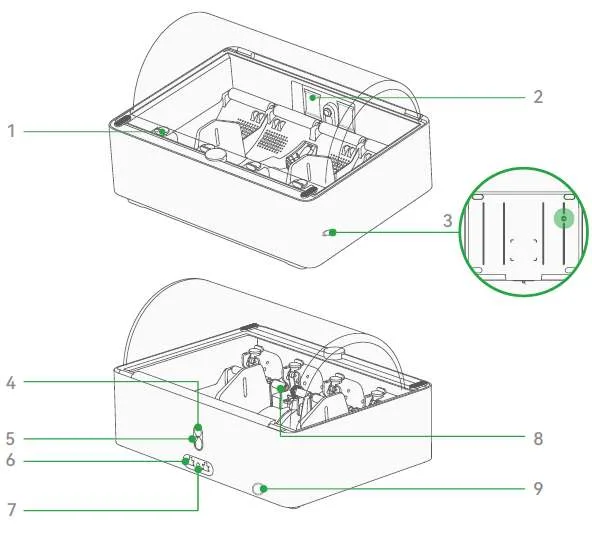
- Filament inlet: Insert the filament end into this inlet, and the system will automatically detect and start loading the filament.
- Desiccant: Keeps the internal AMS chamber dry.
- Air intake: Introduces external dry air.
- PTFE tube release button: Press this button on the back of the AMS to release and remove the PTFE tube.
- Filament outlet: Connects the AMS to the printer’s filament inlet.
- Bambu Bus port 6-pin: Used to connect the AMS to the printer or other AMS units.
- Power connector: Plug the power adapter into this port to supply power for the drying function.
- Active support shaft: Actively supports and drives the rotation of the filament spool.
- Air vent: Expels moisture inside the AMS.
1.4 Printer and AMS Status
1.4.1 AMS 2 Pro Status Indicator
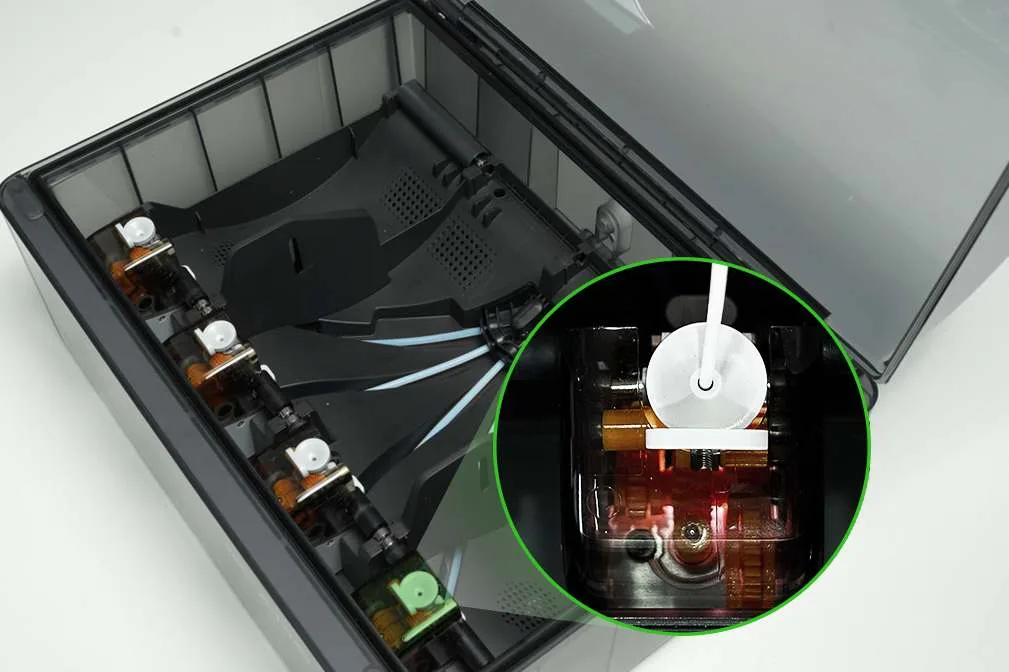
The AMS indicator shows the current operating status: white light indicates normal operation, while red light indicates an error or fault.
| Normal Status Blink Patterns | Meaning |
|---|---|
| Four slots with white lights flashing in sequence | AMS is initializing after power-on, and the white light turns solid when initialization is completed. |
| Four slots with solid white lights | After AMS initialization, or when the screen is woken and all 4 slots have filament inserted (only slots with filament light up when the screen is woken). |
| Solid white light stays on | This slot is performing preloading, reading, or printing operations (including loading and unloading). |
| White light off |
|
| Four slots breathing white | Normal drying status. |
| Error Status Blinking Patterns | Meaning |
|---|---|
| Four slots flashing red – double flash | The printer cannot detect AMS due to a communication error. |
| Red light breathing | No filament is detected after the printing starts. Operation resumes normally once the filament is inserted. |
| Red light solid | Filament may be broken inside the AMS internal hub. |
| Red light single flash | Generally indicates load failure. Please check whether the filament inlet is functioning properly. |
| Red light double flash | Failed to load or unload filament. |
| Four slots breathing red |
|
1.4.2 HMS Messages
HMS (Health Management System) is the built-in fault diagnosis and status monitoring system for Bambu Lab printers and AMS (Automatic Material System).
When a device experiences hardware failure, print failure, or needs maintenance, HMS provides notifications on the printer screen or in software such as Bambu Handy and Bambu Studio, and offers recommended solutions.
You can tap the message icon at the bottom right of the homepage, or the message icon in the left menu, to access the message page and view details. Use any of the following methods to diagnose and fix issues.
If an HMS message appears, use any of the following methods to locate and fix the fault:
- Scan the QR code with your phone to directly access the diagnostic and troubleshooting page.
- Visit the Bambu Lab Wiki and search the HMS code to view detailed causes and troubleshooting steps for the fault.
1.5 Screen Icons
The main menu bar is on the left side of the printer screen. Tap the icons to jump to the Home, Control, Filament, Settings, or Message pages to configure and operate the printer. See Common Screen Controls for detailed feature descriptions and operation instructions.
Homepage
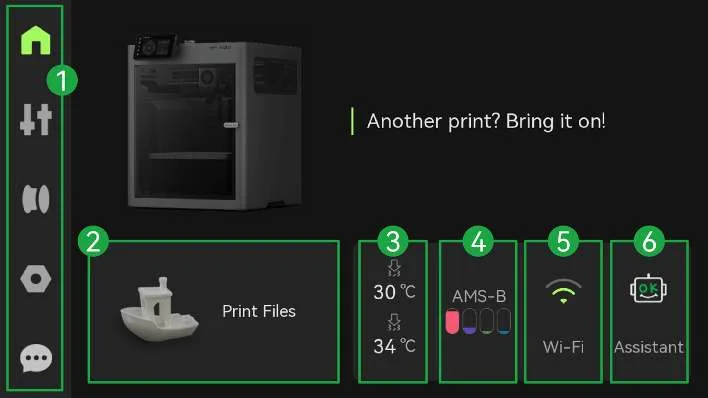
- Select internal models or USB stored models.
- Quick access to nozzle and extruder adjustments.
- Quick access to the AMS filament page.
- Quick access to network settings.
- Quick access to the message page to check HMS (Health Management System) errors.
Control
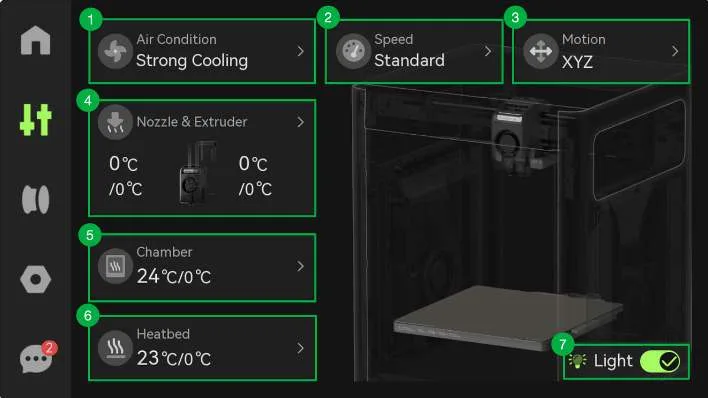
- View and manually set the air management mode and fan speed.
- Set print speed mode.
- Control the motion of the toolhead and heatbed along the X, Y, and Z axes.
- Set the nozzle type and temperature. Control the extruder to extrude or retract filament.
- View and set chamber temperature.
- View and set heatbed temperature.
- Control the LED light inside the chamber.
Filament
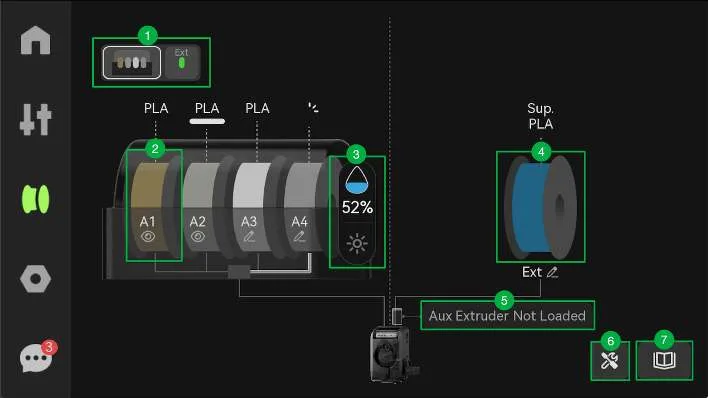
- Switch between AMS and external spool information.
- Tap any AMS spool icon to edit filament, load or unload filament, and re-read filament RFID.
- View humidity and temperature inside the AMS, and perform drying.
- Tap the external spool icon to edit filament and load or unload filament.
- Indicates the loading status of the auxiliary extruder.
- Enable auto refill, AMS setup, and drying functions.
- View filament loading guide.
Settings
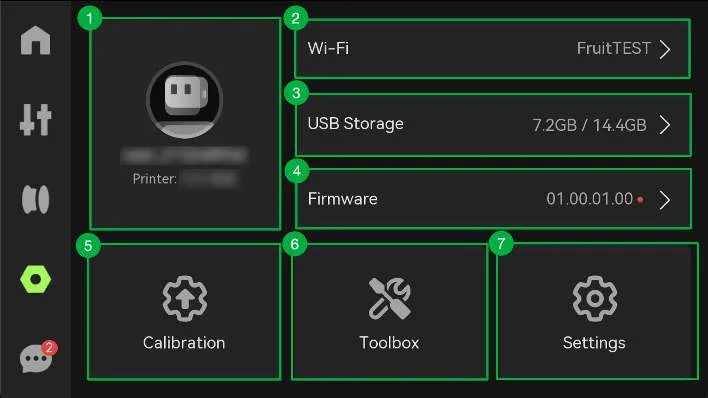
- Log in and view account.
- Configure printer network.
- Configure USB storage.
- View and update firmware.
- Start print calibration.
- Use functions such as printer maintenance and filament drying.
- Other basic settings.
Message
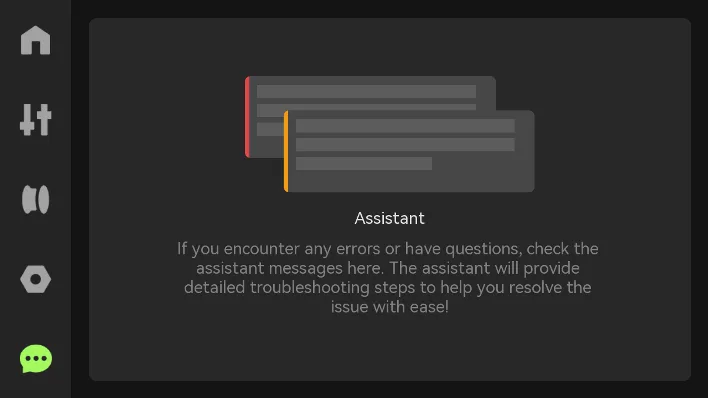
When the printer requires maintenance or encounters a fault, related prompt messages will be displayed here (see HMS messages).