
Print Quality Issues and Solutions
Source: X2D 3D Printing User Manual · v1.0 · 2026.05 · p. 118–126
9.1 Find Your Print Issue
Use the visual index below to identify your print issue, then jump to the matching section for possible causes and solutions.
- First layer not sticking — see 9.2.1
- First layer too low — see 9.2.2
- First layer too high or sparse — see 9.2.3
- Air printing, clogging, and under-extrusion — see 9.3.1
- Model warping or falling off — see 9.3.2
- Model collapse and Spaghetti — see 9.3.3
- Poor overhang quality — see 9.4.1
- Stringing and oozing — see 9.4.2
- Gloss difference — see 9.4.3
- Seam — see 9.4.4
- Top layer overflow (over-extrusion) — see 9.5.1
- Top layer gaps (under-extrusion) — see 9.5.2
9.2 First Layer Issues
9.2.1 First Layer Not Sticking
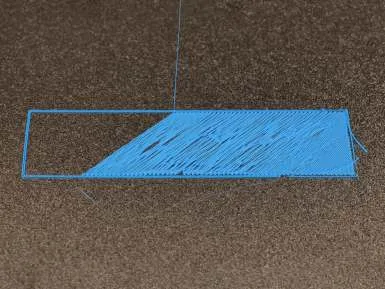
When printing the first layer, if the material does not firmly adhere to the build plate surface, the printed lines may be thin, wavy, or dragged as the nozzle moves. As printing continues, the model may shift or detach from the build plate, causing print failure.
Possible Causes and Solutions
- Mismatched build plate — Ensure the build plate is compatible with the filament, and select the correct build plate in Bambu Studio.
- Dirty build plate surface — Clean the build plate surface with warm water and a neutral detergent to remove any contaminants without damaging the build plate coating.
- Bed leveling not performed — On the printer screen, select Calibration › Print Calibration › Bed Leveling to perform heatbed leveling. Alternatively, on the Device page in Bambu Studio, select Calibration › Bed Leveling to perform heatbed leveling.
9.2.2 First Layer Too Low
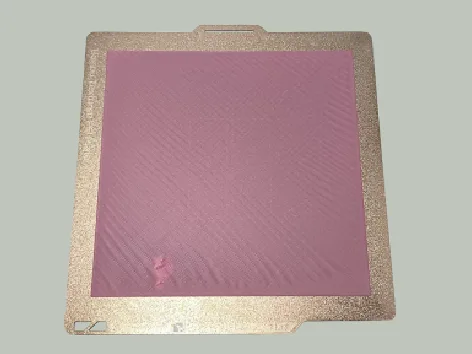
When printing the first layer, if the nozzle is too close to the build plate, the extruded material will be over-compressed. The printed lines may appear significantly wider, with raised edges from excess extrusion. The surface may look flattened, and the nozzle might scrape the printed material as it moves.
Possible Causes and Solutions
- Heatbed not leveled
- On the printer screen, go to Calibration › Print Calibration, and run Auto Bed Leveling and High-temperature Bed Leveling.
- Enable Auto Bed Leveling when sending the print job.
- Loose hotend locking tab — Remove the silicone sock for hotend and check whether the locking tab is securely fastened.
- Incorrect distance between the nozzle and heatbed — On the printer screen, go to Calibration › First Layer Quality Calibration. Set the gap to 0.02, then print a test.
9.2.3 First Layer Too High or Sparse
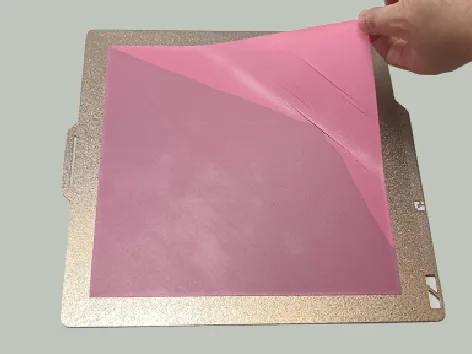
If the nozzle is too far from the build plate when printing the first layer, the extruded material cannot be properly pressed down and spread out. The lines may appear thin and rounded, with noticeable gaps between them, preventing them from forming a continuous surface. Overall, the first layer may look loose or incomplete.
Possible Causes and Solutions
- Heatbed not leveled
- On the printer screen, go to Calibration › Print Calibration, and run Auto Bed Leveling and High-temperature Bed Leveling.
- Enable Auto Bed Leveling when sending the print job.
- Loose hotend locking tab — Remove the silicone sock for hotend and check whether the locking tab is securely fastened.
- Residual material on the nozzle causing height errors — Check and clean the nozzle wiper, including the wiping plate and nozzle wiping pad. Ensure the center of the nozzle wiping plate is not deformed, and the nozzle wiping pad is clean and not cracked. Replace the nozzle wiping pad and nozzle wiping plate if necessary.
9.3 Print Issues During Printing
9.3.1 Air Printing, Clogging, and Under-Extrusion
During printing, if the nozzle or extrusion path becomes clogged or extrusion is unstable, filament may not be extruded consistently. This can cause missing lines, layer gaps, or areas with little or no material. In severe cases, the nozzle continues moving, but little to no filament comes out, and the print cannot continue properly.
Possible Causes and Solutions
- Clogged nozzle — Check whether the extrusion path is clogged. For details, see Toolhead Clog Troubleshooting.
- Clogged extruder — Clear any blockage from the nozzle or extruder based on the troubleshooting results. For nozzle cleaning methods, see Clean Hotend Clog.
9.3.2 Model Warping or Falling Off
During printing, if the model shrinks locally or does not adhere firmly to the build plate, it may warp, detach completely, or even collapse. Warped areas are often accompanied by a visible horizontal ridge. This happens because the warped area moves closer to the nozzle, causing the extrusion lines to be flattened and overflow.
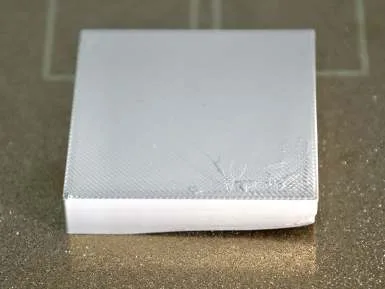
Possible cause: Insufficient adhesion between the model and the build plate.
Solutions
- Make sure the build plate is compatible with the filament and select the correct build plate type in Bambu Studio or Bambu Handy.
- Enable or increase Brim in Bambu Studio to increase the contact area between the model base and the build plate.
- Perform heatbed leveling.
- Clean the build plate and nozzle.
- Apply glue to the build plate surface if necessary to enhance adhesion.
- Increase the bed temperature appropriately.
9.3.3 Model Collapse and Spaghetti
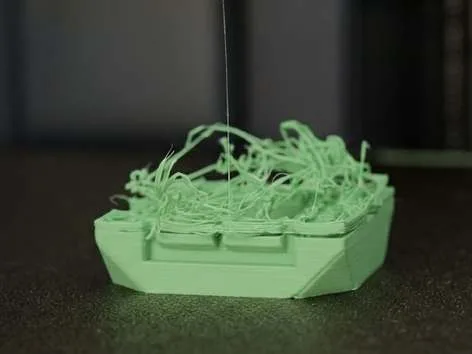
During printing, if the model does not adhere firmly to the build plate or lacks structural stability, it may shift or partially collapse. The extruded filament cannot stack along the intended path, gradually forming tangled strands or blobs that look like spaghetti.
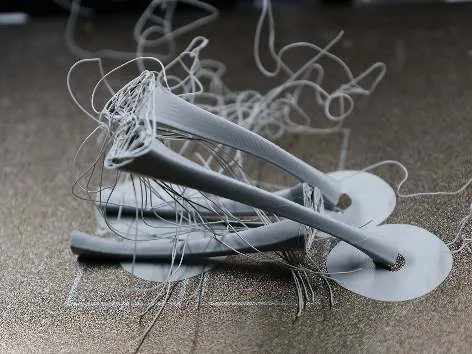
Possible Causes and Solutions
- Small contact area between the model and the build plate — Enable Brim in Bambu Studio to increase the contact area.
- Part of the model is floating above the build plate in Bambu Studio — Click the icon in the top toolbar of Bambu Studio to automatically use a larger flat surface as the base.
- The model has tall, thin, or overhanging sections — Add extra supports to secure these areas. You can also paint supports manually.
- The model is too tall or has an unstable center of gravity — Add supports and reduce print speed and acceleration. Lay the model flat whenever possible, or split the model before printing if needed.
9.4 Surface Quality Issues
9.4.1 Poor Overhang Quality
When printing overhangs, if the extruded material does not cool and solidify in time, it may sag because there is no support underneath. The overhang area may show drooping, uneven edges, or a rough surface, affecting both appearance and structural quality.
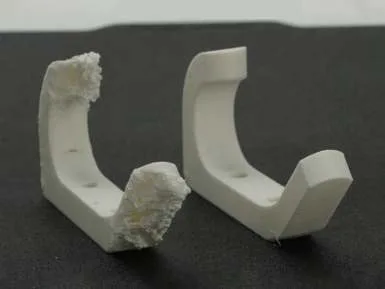
Possible Causes and Solutions
- Insufficient support — Check the overhang angle. If the angle from vertical is greater than 45°, add support structures.
- Print speed too high — Reduce the print speed, or enable the Slow down for overhangs function.
- Insufficient cooling — Lower the nozzle temperature as needed, increase the auxiliary part cooling fan and part cooling fan speeds, and open the printer front door and top glass cover to improve heat dissipation.
9.4.2 Stringing and Oozing
During printing, if molten filament continues to ooze from the nozzle during movement or travel, fine strands may appear on the model surface, or excess material may build up in some areas. This usually appears as stringing between models or across surfaces, or as small blobs of excess material.
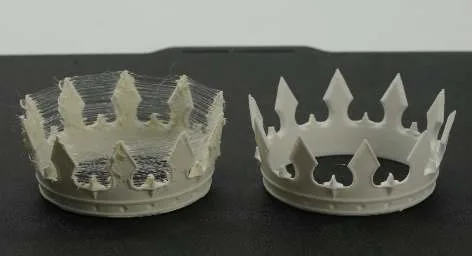
Possible Causes and Solutions
- Damp filament — Dry the filament. For detailed steps, see Filament Drying.
- Long travel distance and insufficient retraction length — Increase the retraction length or speed appropriately to prevent molten filament from leaking during travel moves.
- Special model structure or improper plate arrangement — Reduce the spacing between models and enable the Avoid crossing walls feature in Bambu Studio.
- Worn or oversized nozzle — Ensure the actual nozzle matches the slicing settings. Check the nozzle condition and replace it if worn.
9.4.3 Gloss Difference
At the same temperature, lower print speeds produce smoother surfaces. At the same speed, higher temperatures produce smoother surfaces. If uneven gloss appears on the model surface during printing, it is usually caused by differences in material melting or cooling rate, which affect flow and lead to changes in surface roughness. This issue is more noticeable on highly reflective materials.
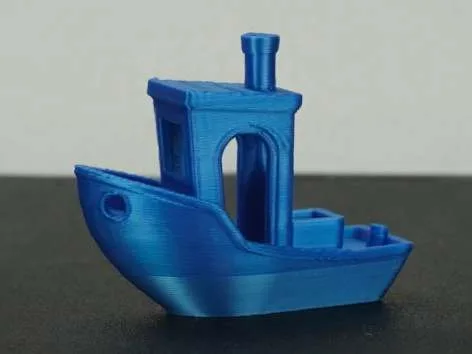
Possible Causes and Solutions
- Significant differences in print speed across different areas of the model, such as slowed overhang areas — For large models, reduce the outer wall speed as needed. For small models, reduce the overall print speed. If necessary, disable Slow down for overhangs.
- High print speed when printing at a low layer height, such as 0.08 mm — This may cause scale-like gloss differences on the model surface. Consider increasing the layer height, lowering print speed, or raising print temperature accordingly.
9.4.4 Seam
In FDM 3D printing, the start and end points of each layer naturally form a seam. This is normal. You can use the following methods to reduce seam visibility and improve the model’s appearance.
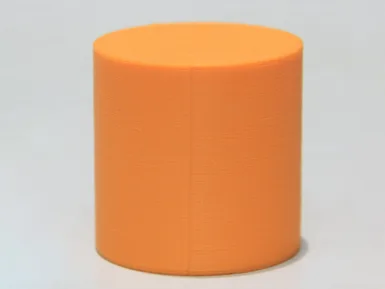
Optimization Methods
- Set the wall loops to 3.
- Print the model separately to avoid seam buildup caused by printing multiple models at the same time.
- Increase the nozzle temperature appropriately and reduce the outer wall speed.
- For ring-shaped or rotationally symmetric models, try enabling Spiral vase mode.
9.5 Top Layer Issues
9.5.1 Top Layer Overflow (Over-Extrusion)
When printing the top surface of a model, if the flow rate is too high, the nozzle is abnormal, or extrusion is unstable, more filament than expected may be extruded. This can cause excess material to build up on the top layer, resulting in an uneven surface, raised lines, and squeezed extrusion paths. Visible bumps or ridges may form, affecting the model’s appearance and accuracy.
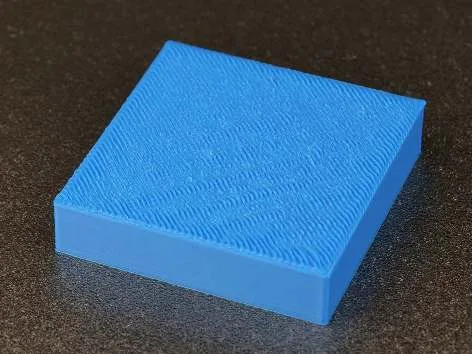
Possible Causes and Solutions
- Flow rate too high — Recalibrate the flow rate on the Calibration page of Bambu Studio.
- Incorrect nozzle size — Verify that the nozzle diameter set in the slicing software matches the actual nozzle.
9.5.2 Top Layer Gaps (Under-Extrusion)
When printing the model’s top layer, if the flow rate is too low, the nozzle is abnormal, or extrusion is unstable, the top layer material may not fill the gaps between adjacent lines. This can cause visible gaps, an uneven surface, and sometimes exposed internal structure or supports, resulting in an incomplete or sunken top surface that affects appearance and flatness.
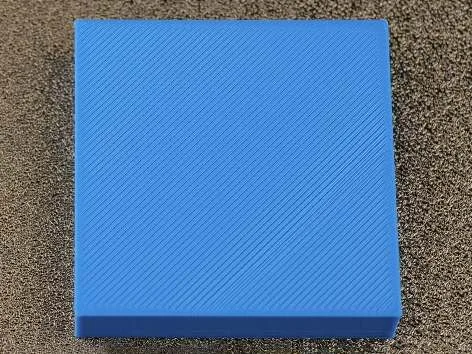
Possible Causes and Solutions
- Flow rate too low — Recalibrate the flow rate on the Calibration page of Bambu Studio.
- Incorrect nozzle size — Verify that the nozzle diameter set in the slicing software matches the actual nozzle.
- Filament extrusion blockage — Clean and maintain the extruder, PTFE tube, and nozzle.