Key Features Introduction
Source: X2D 3D Printing User Manual · v1.0 · 2026.05 · p. 74–93
6.1 Dual Extrusion System
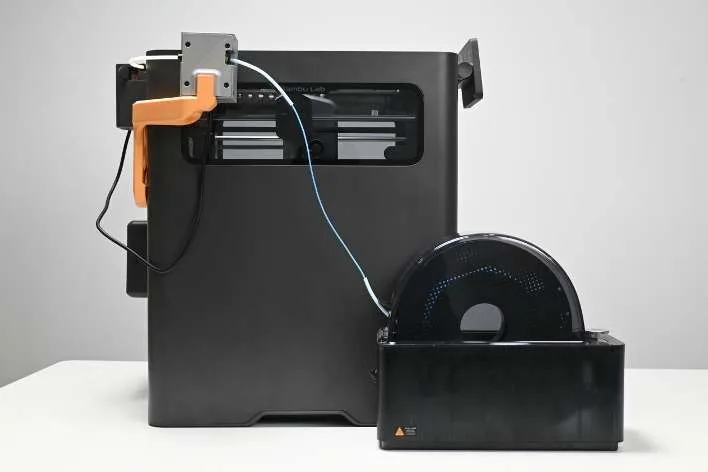
The X2D features an innovative dual extrusion system. The main extruder handles near-range extrusion, while the auxiliary extruder manages remote extrusion, balancing print precision and filament feed stability.
The main extruder is installed in the toolhead. It handles extrusion for the main hotend filament and provides responsive flow control, making it a key component for print quality.
The auxiliary extruder is mounted at the top of the printer’s rear panel. It handles remote extrusion for the auxiliary hotend filament, overcoming friction from the long path to ensure stable filament delivery.
With the integrated remote extrusion solution, the X2D offers the following key advantages:
- Smarter structure: Only the main extruder is installed in the toolhead, while the auxiliary extruder is mounted separately at the top of the rear panel. This gives the printer a more efficient structure and maintains a 256 × 256 mm build volume without increasing the overall printer size.
- Lighter motion: Separating the auxiliary extruder from the toolhead effectively reduces the toolhead’s size and weight, improving its motion agility.
- More efficient printing: When printing multi-color models or support structures, the dual extrusion system significantly improves filament change efficiency and reduces filament waste.
6.2 Dual Hotends Printing
The printer features dual hotends that quickly switch filaments within the same print job. This enhances the model’s appearance and functionality while significantly reducing print time.
6.2.1 Printable Area
Because the printer has dual hotends, the printable areas of the two hotends differ slightly due to the machine’s structure.
Horizontal Printing Area
The printer’s maximum build volume is 256 × 256 mm, but the two hotends have different maximum printable areas:
- Main hotend: 256 × 256 mm
- Auxiliary hotend: 235.5 × 256 mm
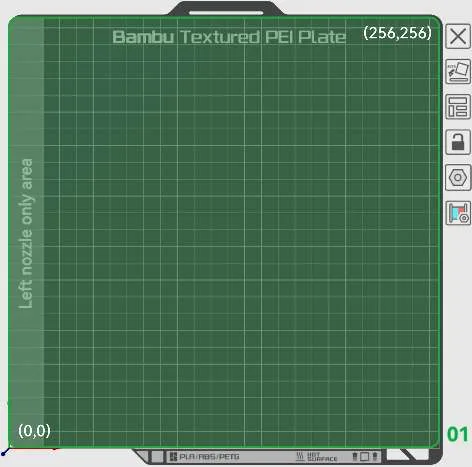
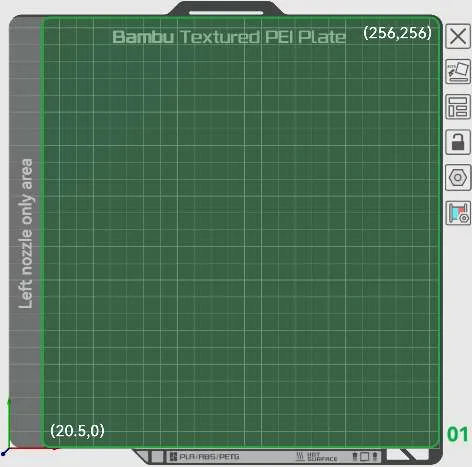
In the Prepare page of Bambu Studio, there is a light gray area on the left side of the plate marked “Left nozzle only area”. This means that objects placed in this area can only be printed with the main hotend.
Vertical Printing Area
The printer’s maximum print height is 260 mm, but the two hotends have different maximum printable heights:
- Main hotend: 260 mm
- Auxiliary hotend: 256 mm
The model height must be ≤ 260 mm and must not exceed the maximum print height of the main hotend.
If the model is taller than 256 mm, such as 258 mm, it can only be printed by the main hotend, even if it is placed in the shared middle area covered by both hotends.
Check Model Placement
When a model is placed in the auxiliary hotend’s non-printable area, all filaments* used by this model can only be printed using the main hotend.
When Bambu Studio detects a conflict between model placement and the printable area, an error message appears. Adjust the model position or filament position before slicing and printing. Common causes include:
- Model too tall: The overall model height exceeds 260 mm.
- Auxiliary hotend and filament position conflict: Filament is assigned to the auxiliary hotend in Custom mode, but the corresponding model position is outside the auxiliary hotend’s printable area.
- Auxiliary hotend and height limit conflict: Filament is assigned to the auxiliary hotend in Custom mode, but the model height exceeds 256 mm.
- Some filament paths exceed auxiliary hotend’s printable area: After using color painting or modifier functions, some filament paths extend beyond the auxiliary hotend’s printable area.
- Purge path extends beyond auxiliary hotend’s printable area: When the Flush into objects’ infill/support function is enabled, slicing detects that the purge path exceeds the auxiliary hotend’s printable area.
6.2.2 Multi-Material Support Printing
Multi-material support printing uses two different filaments to print the model body and supports separately. By taking advantage of the incompatibility between materials, it makes supports easier to remove and significantly improves the model’s surface finish.
6.2.3 Select Filament Grouping Mode
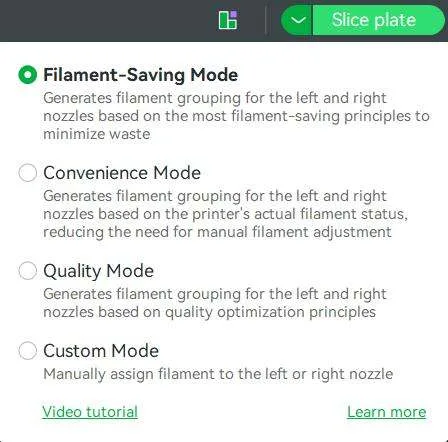
Bambu Studio intelligently assigns suitable nozzles and print orders based on the required filament number, the purge volume of different print sequences, and the physical properties of the hotends. It provides 4 filament grouping modes: Filament-Saving, Convenience, Quality, and Custom. Filament-Saving mode is enabled by default and does not need to be turned on manually.
To switch the grouping mode, use one of the following methods:
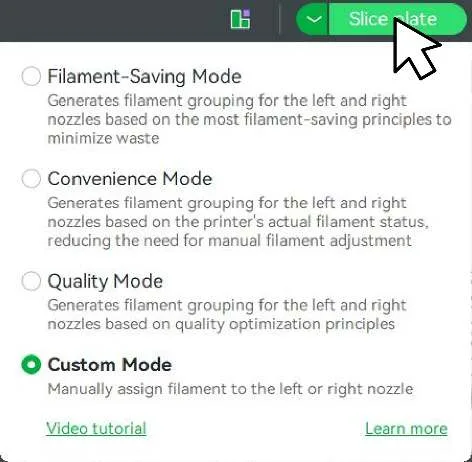
- Method 1: Hover over the Slice button and select the desired mode from the pop-up window.
- Method 2: Click the filament grouping icon on the right side of the plate to view and set the filament grouping mode for the plate.
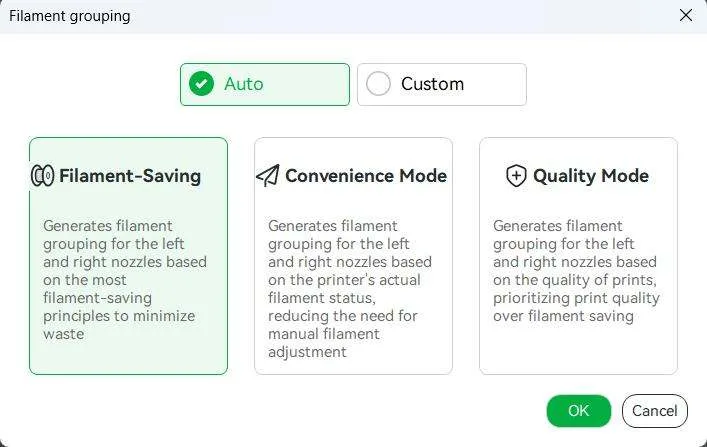
Filament-Saving Mode
Filament-Saving Mode aims to minimize filament waste caused by purging during filament changes. It assigns filaments to different hotends when they frequently appear on the same layers or require a large purge volume during filament changes.
Before using this mode, it is recommended to manually set or sync the AMS-to-hotend pairing so that filament grouping matches the actual filament placement. If the printer is not connected to an AMS, each hotend defaults to connecting to an external filament spool.
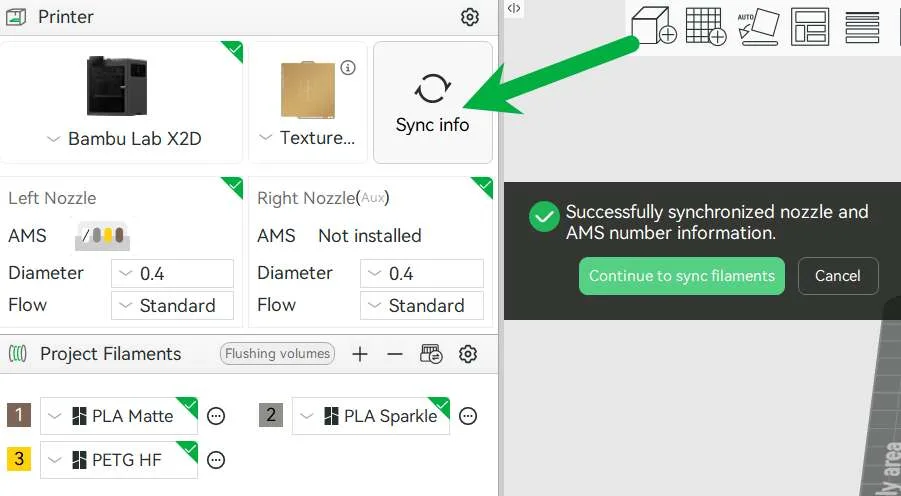
After slicing, each filament is bound to a specific nozzle. When sending the print job, the printer cannot switch to another nozzle even if it has a filament with a closer color match. If you want to save filament while achieving a better color match, manually adjust the filament placement based on the grouping result.
To enable fully automatic printing in filament-saving mode, you can purchase the filament track switch separately. This accessory supports flexible mapping between AMS units and two hotends, allowing filaments in an AMS to be delivered to either target hotend and greatly reducing manual intervention. For details, see Filament Track Switch.
Convenience Mode
Convenience Mode groups filaments based on their actual placement in AMS, typically requiring no additional adjustments. It suits scenarios where frequent manual AMS adjustments are inconvenient.
Before using this mode, ensure the printer is connected. To ensure accurate filament matching, it is recommend to sync the AMS information in the filament list before slicing so the software data matches the actual filament placement.
Quality Mode
Quality mode focuses on overall print quality, prioritizing dimensional accuracy and surface finish.
When using a different filament for the support or raft interface, this mode assigns the auxiliary hotend to print the support interface and the main hotend to print the model body, improving print quality. See Multi-Material Support Printing for details.
Custom Mode
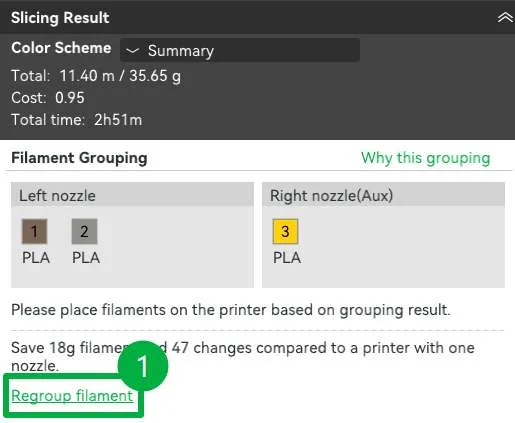
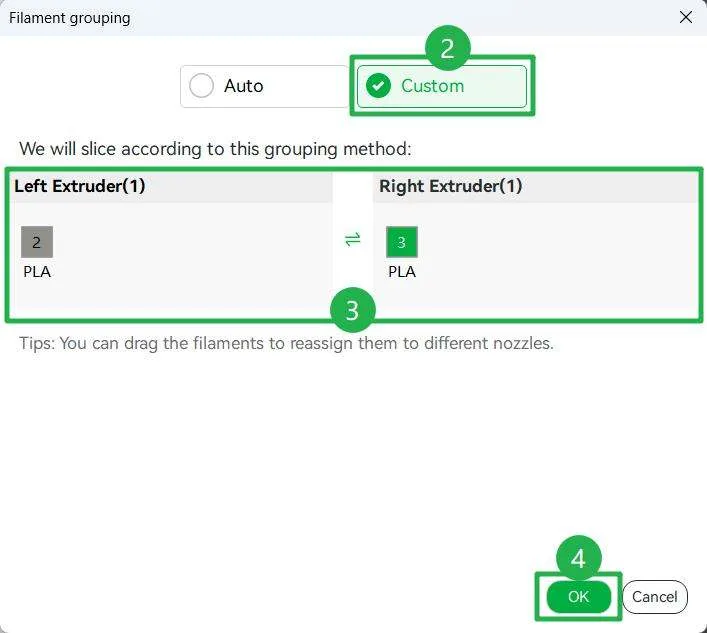
In Custom Mode, you can freely adjust the filament-to-nozzle mapping as needed. This mode is suitable when none of the other three modes meet your printing requirements. Follow these steps:
- Select Custom Mode.
- In the Preview page, click Regroup filament in the slicing result panel.
- In the Prepare page, hover over the slice button, select Custom Mode from the pop-up window, then click Slice Plate.
- Select Custom in the pop-up window.
- Drag the filament to your target nozzle.
- Click OK, and Bambu Studio will recalculate the slicing results based on your adjustments.
- After slicing, the system will display how much filament could be saved by using the filament-saving mode compared to your manual grouping. This helps you decide whether to optimize the grouping.
Select Slicing Mode
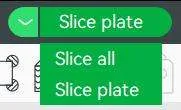
To apply the same filament grouping mode to all build plates, select a grouping mode and click Slice all. All plates will use the same grouping strategy, and the original plate settings will be overwritten.
To set filament grouping modes individually for each plate, configure the filament grouping for a single plate, then click Slice plate.
6.3 High Precision Printing
6.3.1 Start Calibration
Method 1: Start calibration from the printer screen
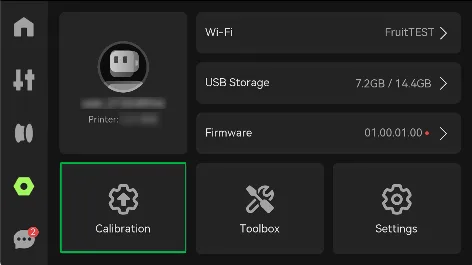
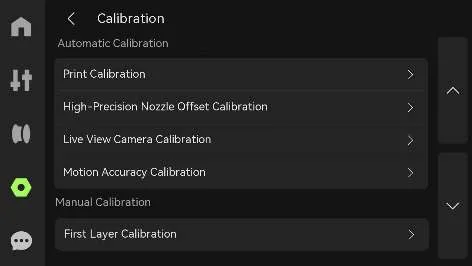
Tap ⚙ > Calibration on the printer screen to enter the calibration page, then select the desired calibration.
Method 2: Start calibration from Bambu Handy
Go to the Devices page in Bambu Handy, tap the icon in the top-right corner > Calibration, then choose the calibration task.
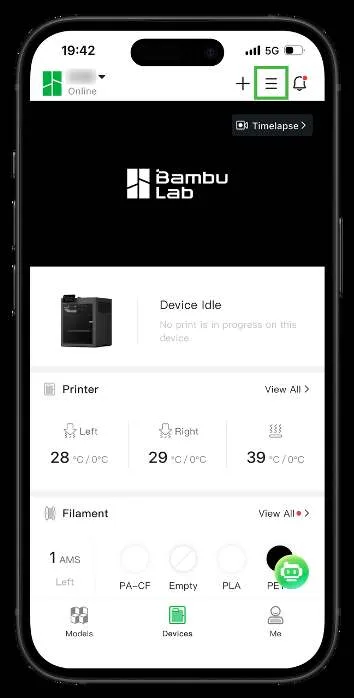
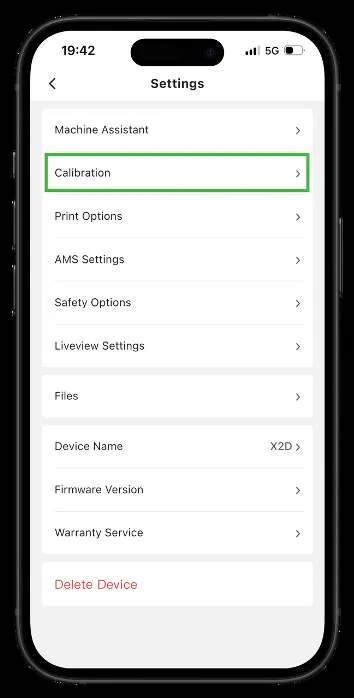
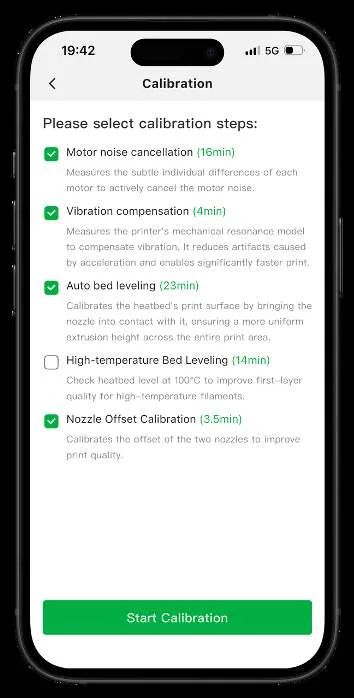
Method 3: Start calibration from Bambu Studio
At the top of the Bambu Studio interface, select Device, click Calibration in the top-right corner, and choose the calibration task as needed.
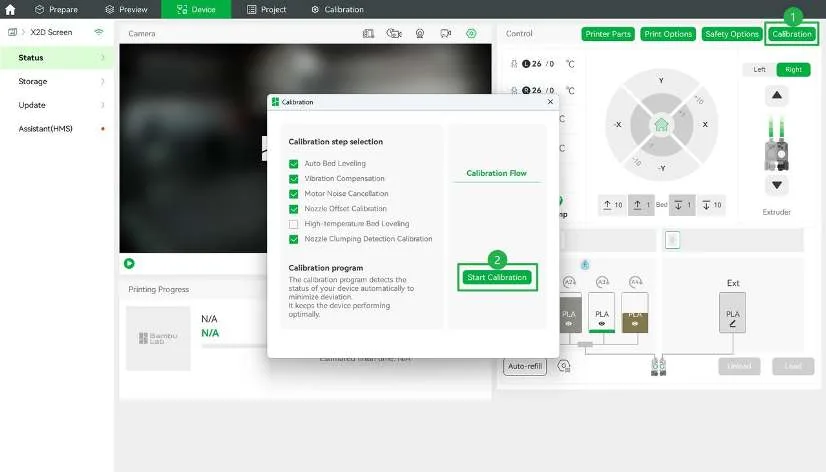
6.3.2 Print Calibration
Print Calibration automatically adjusts key printer settings using built-in sensors to ensure optimal print conditions.
- Motor Noise Cancellation: Reduces motor noise to improve print surface quality.
- Vibration Compensation: Detects and compensates for vibration during printing to reduce acceleration artifacts and increase print speed.
- Auto Bed Leveling: Detects heatbed flatness by touching the nozzle to the build plate, ensuring more consistent first-layer extrusion.
- High-temperature Bed Leveling: Measures the flatness of the heatbed at 100 °C to improve the first-layer print quality for high-temperature filaments such as ABS, ASA, PC, and PA.
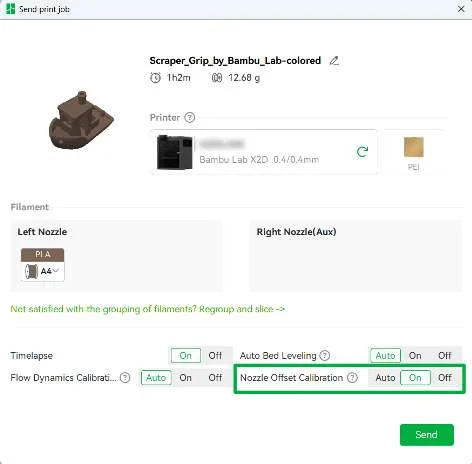
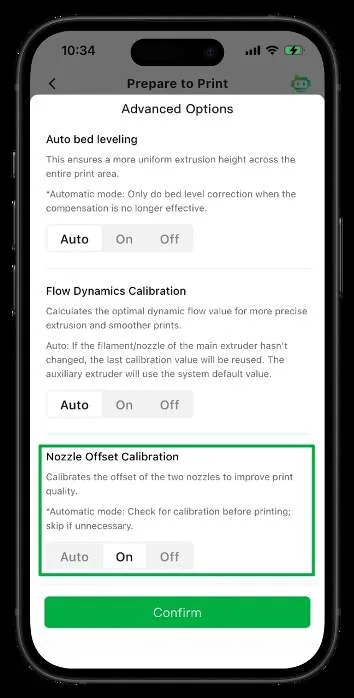
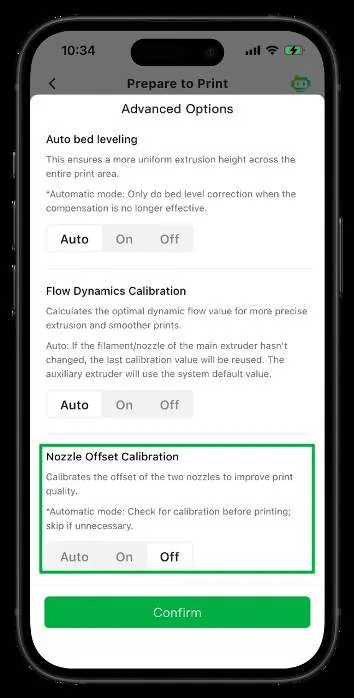
- Nozzle Offset Calibration: Calibrates the XYZ position offset between the two nozzles to prevent model misalignment when switching nozzles.
How to use nozzle offset calibration data?
- Method 1: Enable nozzle offset calibration on the Send Print Job page in Bambu Studio.
- Method 2: On the Prepare to print page in Bambu Handy, enable nozzle offset calibration in Advanced Options.
When is print calibration required?
- Before the first print on a new printer.
- After the printer experiences a severe collision, is moved, or is disassembled and reassembled.
- After adjusting the belt tensioner.
- When print quality issues occur.
- As part of routine maintenance.
6.3.3 High-Precision Nozzle Offset Calibration
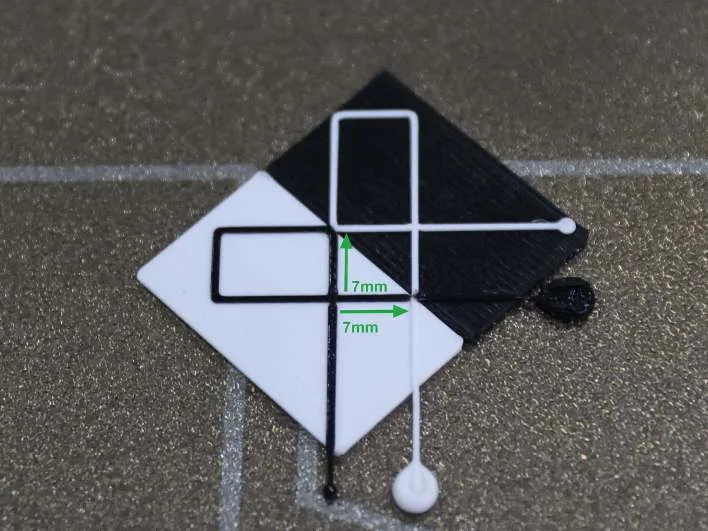
Precisely calibrates the XY position offset between the two nozzles to ensure print paths align correctly when switching nozzles, improving surface quality and layer alignment.
Using AI vision recognition, the printer detects the actual printed line positions from both nozzles, calculates the XY offset, and automatically compensates during printing.
Compared with nozzle offset calibration, this method calculates the offset based on actual printed lines for higher positioning accuracy.
On the printer screen, select ⚙ > Calibration > High-Precision Nozzle Offset Calibration, then tap Start.
How to use high-precision nozzle offset calibration data?
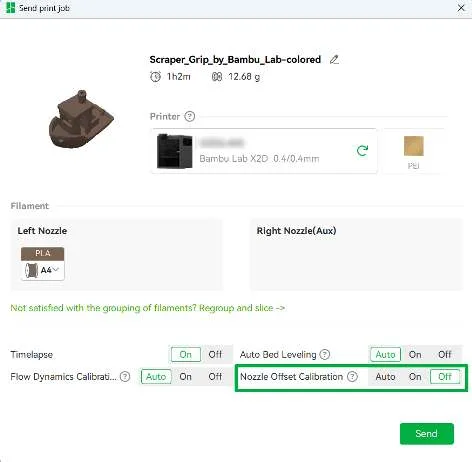
- Method 1: On the Send Print Job window in Bambu Studio, turn off nozzle offset calibration.
- Method 2: On the Prepare to print page in Bambu Handy, turn off nozzle offset calibration in Advanced Options.
When is nozzle offset calibration needed?
Run nozzle offset calibration when noticeable layer shifts occur during dual-nozzle printing. Choose either nozzle offset calibration or high-precision nozzle offset calibration as needed.
6.3.4 Live View Camera Calibration
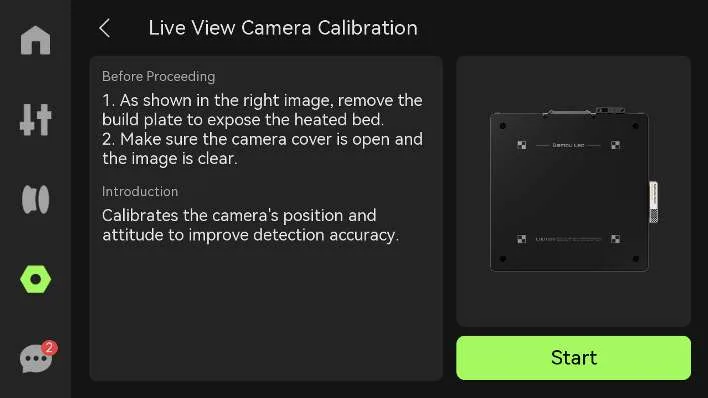
After replacing the live camera, calibrate it to ensure accurate visual AI detection results.
On the printer screen, select ⚙ > Calibration > Live View Camera Calibration, then tap Start.
6.3.5 Motion Accuracy Calibration
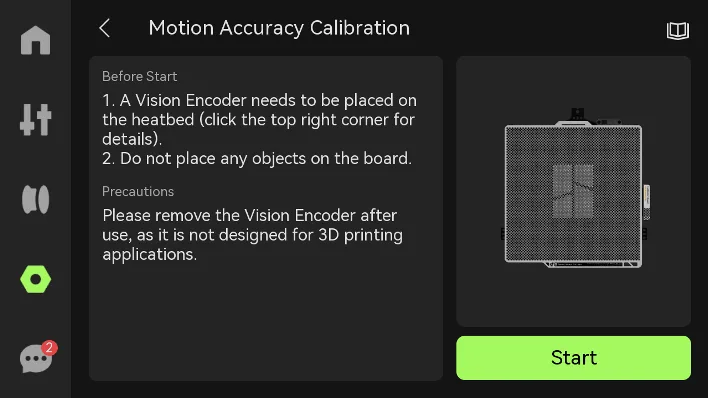
Improves printer positioning accuracy for large-format or high-precision prints. After calibration, motion lag and distortion are reduced, improving dimensional accuracy and assembly fit.
During calibration, the toolhead camera scans the pattern on the vision encoder to obtain the actual coordinates. The system compares the actual coordinates with the theoretical coordinates, calculates and compensates for motion errors, and generates corrected high-precision motion coordinates.
The calibration result remains stable. Frequent calibration is not required unless there are assembly changes or damage, and the result is not affected by filament or hotend changes.
How to use motion accuracy calibration data?
On the printer screen, tap ⚙ > Settings > Print Options, and select Motion Accuracy Enhancement. This option is enabled by default.
When is motion accuracy calibration needed?
- When enabling Motion Accuracy Enhancement for the first time on a new printer.
- After the printer experiences a severe collision, is moved, or is disassembled and reassembled.
- After adjusting the belt tensioner.
- As part of routine maintenance. We recommend running it every two weeks.
6.3.6 First Layer Calibration
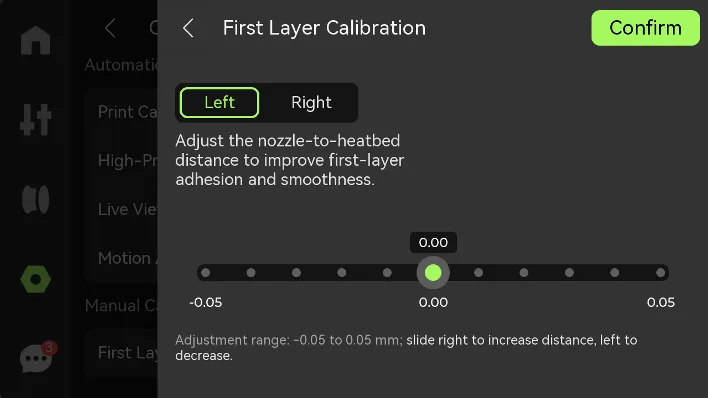
Fine-tune the distance between the nozzle and heatbed during first layer printing to fix poor adhesion and uneven surfaces caused by the first layer being too high or too low.
On the printer screen, go to ⚙ > Calibration > First Layer Calibration. Select the hotend, then slide to adjust the distance between the nozzle and the heatbed.
6.4 Intelligent Detection
This printer is equipped with multiple intelligent detection features that can automatically identify issues such as nozzle clogs, air printing, or material buildup during printing and provide timely alerts. This helps improve print success rates while reducing material waste and the risk of equipment damage. The entire detection process is fully automated, making printing more reliable and worry-free.
6.4.1 Enable Intelligent Detection
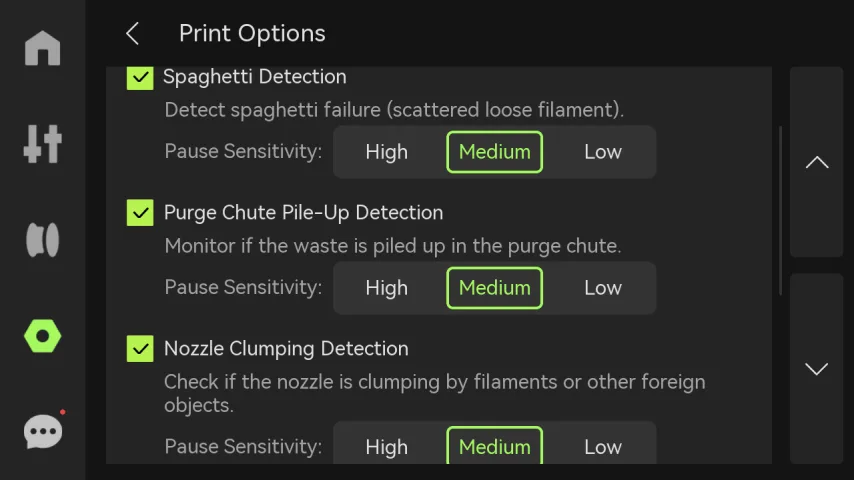
- On the printer screen, tap ⚙ > Settings > Print Options, then select intelligent visual detection (AI detection), and adjust the detection sensitivity.
- In Bambu Studio or Bambu Handy, go to Devices Page > Print Options to configure.
6.4.2 Live View Camera Intelligent Detection
During printing, the live view camera captures images at a fixed frequency, and the AI algorithm compares and analyzes them. If a print issue is detected, the printer automatically pauses and displays a pop-up alert.
- Spaghetti Detection: Triggers an alert when filament tangling or a stable blob is detected under the nozzle.
- Purge Chute Pile-Up Detection: Monitors the purge wiper and detects waste buildup to prevent excessive waste from causing toolhead collisions or Step Loss.
- Nozzle Clumping Detection: When clumping reaches a certain size, the printer usually detects it within 2 minutes, displays a pop-up alert, and pauses printing.
- Foreign Object Detection: Captures two images at different heatbed heights to identify any foreign objects on the heatbed area.
- Printed Part Displacement Detection: Detects whether the printed part has collapsed or shifted.
- Build Plate Detection: Includes Type Detection and Alignment Detection. The printer takes photos to check whether the build plate type matches the slicing information and whether the build plate is properly placed.
- Live View Camera Obstruction and Dirt Detection: After starting a print job, the printer automatically checks whether the camera is blocked or dirty.
6.4.3 Toolhead Camera Intelligent Detection
The toolhead camera performs motion accuracy calibration and high-precision nozzle offset calibration. It also supports detection of build plate alignment and toolhead camera contamination.
- Build Plate Alignment Detection: After completing heatbed homing and build plate type recognition, the printer takes a photo of the heatbed positioning block to check if the build plate is placed correctly.
- Toolhead Camera Contamination Detection: Before performing calibration and detection tasks, it takes a photo of the calibration sticker on the right side of the heatbed to check its cleanliness.
6.4.4 Air Printing and Filament Tangle Detection
The printer firmware integrates air printing and filament tangle detection features. These functions work together through the filament buffer, the in-house servo motor in the main extruder, and the AMS to detect issues and send alerts.
AMS detection
During filament loading, the AMS monitors odometer wheel sensor data in real time. If the expected feed length increases but the odometer wheel count does not change, air printing is detected. If motor resistance is too high, a filament tangle or jam is detected.
Filament buffer detection
The filament buffer is located on the rear panel of the printer. When filament tangles, the orange slider moves left. The system detects the abnormal slider position and pauses printing.
Extruder motor detection
The extruder motor is located in the main extruder inside the toolhead. It detects extrusion status based on load current. Low load may indicate a thin or worn filament, causing air printing. High load may indicate filament tangle or clogging.
6.5 Adaptive Airflow System
This printer is equipped with an adaptive airflow system composed of an adaptive airflow switching unit, chamber heater unit, air filter, and exhaust fan. It automatically switches air ducts based on the current air management mode to regulate the internal temperature and airflow, providing the optimal printing environment for different filaments.
During slicing, the printer automatically selects the appropriate air management mode based on the filament type. This prevents warping with high-temperature materials and clogging with low-temperature materials. It also dynamically adjusts fan speed and heating power to keep the temperature stable, save energy, and reduce noise, ensuring print quality and efficiency across different printing scenarios.
6.5.1 Strong Cooling Mode
When printing heat-sensitive filaments such as PLA and TPU, the air management system is set to strong cooling mode.
In this mode, the auxiliary part cooling fans built into both sides of the chamber draw in external cool air to lower the chamber temperature. Meanwhile, the heated air is filtered through the air filter and expelled via the external exhaust fan. The vents at the back of the printer and the gaps around the purge wiper also help with cooling.
6.5.2 Heating Mode
When printing high-temperature filaments such as ABS, ASA, PC, and PA, the air management system switches to Heating Mode.
In this mode, the left and right side units no longer draw in outside cool air. The chamber heating fan on the left turns on automatically, while the auxiliary part cooling fan on the right works with the air filter to create internal circulation. This keeps the hot air inside the chamber evenly distributed while filtering and purifying the air.
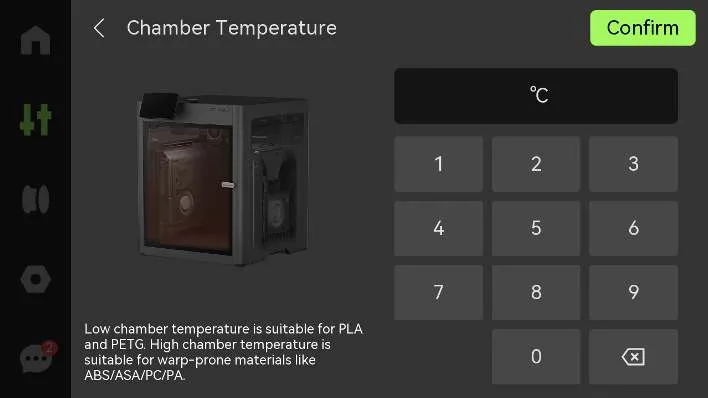
6.5.3 Custom Chamber Temperature
You can set the chamber temperature via the printer screen, Bambu Studio, or Bambu Handy. The system will automatically switch to heating mode.
6.6 Optional Upgrade Accessories
6.6.1 Filament Track Switch
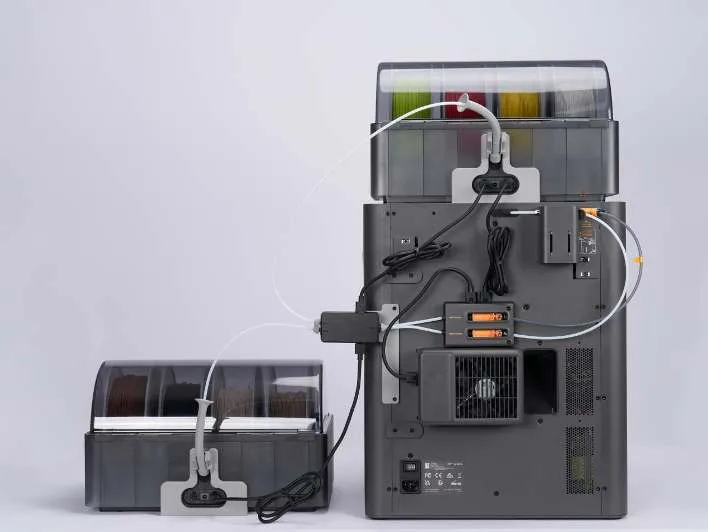
When a dual-hotend printer is connected to multiple AMS units, the mapping between AMS units and hotends is fixed. If the filament grouping mode is set to Filament-Saving and the actual filament connection does not match the system-assigned layout, you need to manually adjust the AMS connections or rearrange the filaments.
The filament track switch allows flexible mapping between AMS units and the two hotends. Filaments in an AMS can be delivered to either target hotend as needed, greatly reducing manual intervention.
6.6.2 TPU Feeding Assist Module
The TPU feeding assist module helps load flexible filament. When printing softer filaments like TPU 90A or 85A, feeding resistance is high. In most cases, you need to open the top cover, position the filament from above, and load it directly through the toolhead filament inlet.
After installing the assist module, you can load filament directly through the module’s filament inlet while the enclosure remains closed. This greatly simplifies TPU printing preparation and reduces loading resistance in various setups.