
Basic Controls and Functions
Source: X2D 3D Printing User Manual · v1.0 · 2026.05 · p. 94–103
This chapter introduces the printer’s common control methods and basic functions, including screen operation, basic settings, print status monitoring, and access to common features. By understanding these operations, you can quickly get started with the daily use and maintenance of the printer.
7.1 Common Screen Controls
This printer is equipped with a full-color touchscreen for displaying the status of the printer and its main components. It also allows you to configure multiple printer settings.
7.1.1 Print Speed
Adjust the print speed in real time during printing. This affects print time and model surface quality. On the printer screen, select Control › Speed to adjust the print speed. Four modes are available:
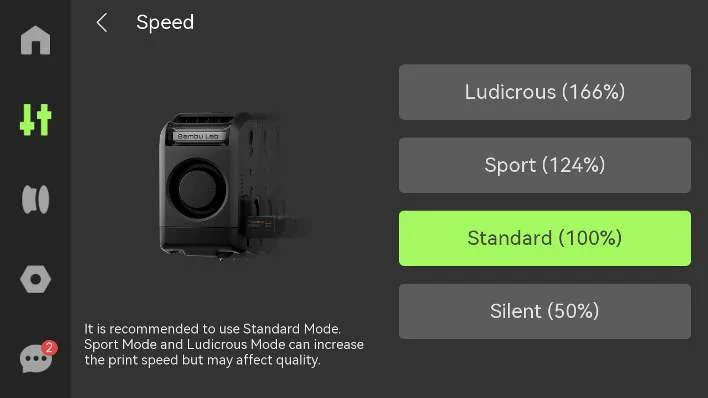
- Ludicrous: 166% of normal print speed and acceleration.
- Motion: 124% of normal print speed and acceleration.
- Standard: normal print speed and acceleration.
- Silent: 50% of normal print speed and acceleration.
Adjust the print speed flexibly according to your needs. Increasing speed shortens print time but may reduce surface quality. Decreasing speed improves surface quality but extends print time.
7.1.2 XYZ Axis Movement
Move the toolhead and heatbed when the printer is idle for easier cleaning or maintenance. On the touchscreen, select Control › Motion to move the toolhead and heatbed.
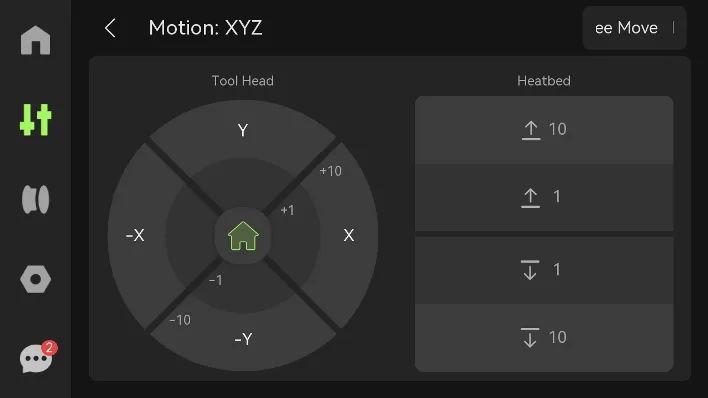
- Toolhead: Tap X/-X and Y/-Y to move the toolhead. The inner ring (+1/-1) moves it in small increments, while the outer ring (+10/-10) moves it in large increments.
- Heatbed: Tap the up or down arrows to raise or lower the heatbed. 1 indicates a small movement, and 10 indicates a larger movement.
- Free Move: When enabled, you can manually move the toolhead and heatbed while the XYZ motors are idle, making maintenance and repair easier.
7.1.3 Nozzle and Extruder
Use this page to switch nozzles, set nozzle temperatures and information, view extruder load status, and manually extrude or retract filament. It is useful for routine maintenance, filament changes, nozzle cleaning, and print preparation.
On the touchscreen, select Control › Nozzle & Extruder to set the nozzle and extruder parameters.
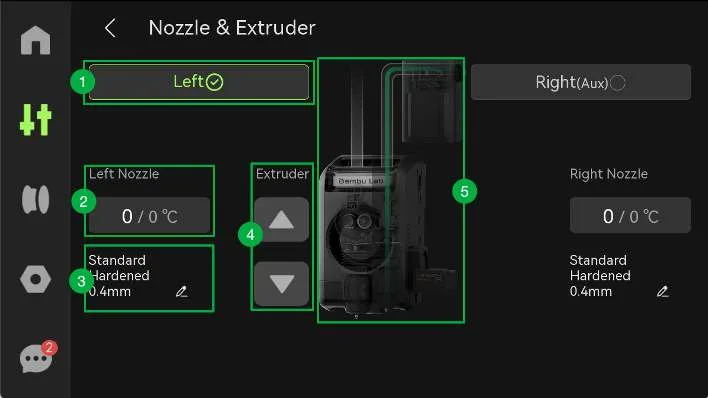
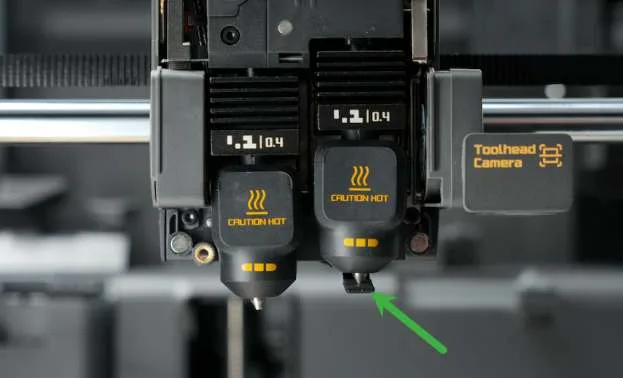
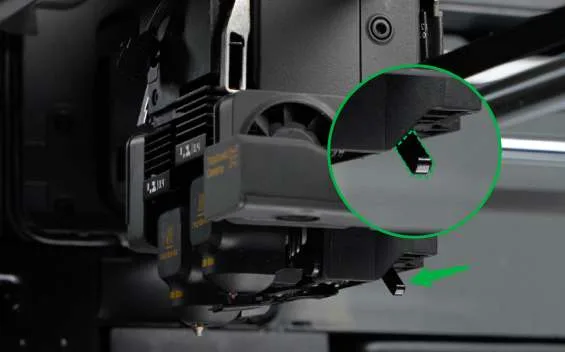
- Switch nozzles: Select Left/Right (Aux) to switch between two nozzles. When selecting one hotend, the flow blocker moves beneath the other one.
- Set nozzle temperature: Enter a value to set the nozzle temperature (°C).
- Set nozzle information: After replacing a hotend, manually update its type, material, and diameter.
- Control the extruder: Tap the buttons to extrude or retract 1 cm of filament.
- Extruder status: Displays the current filament color and load status.
7.1.4 Heatbed and Chamber Temperature
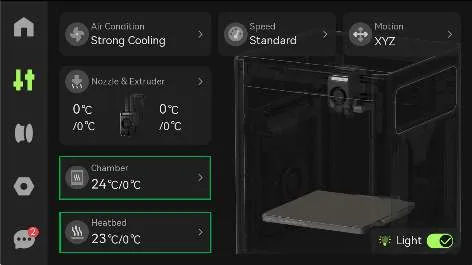
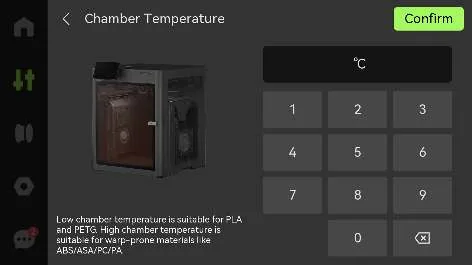
On the Control page, you can view real-time chamber and heatbed temperatures. Tap Chamber or Heatbed to enter a value and set the temperature.
7.1.5 Chamber Light Mode
On the touchscreen, select Settings › Chamber Light Mode.
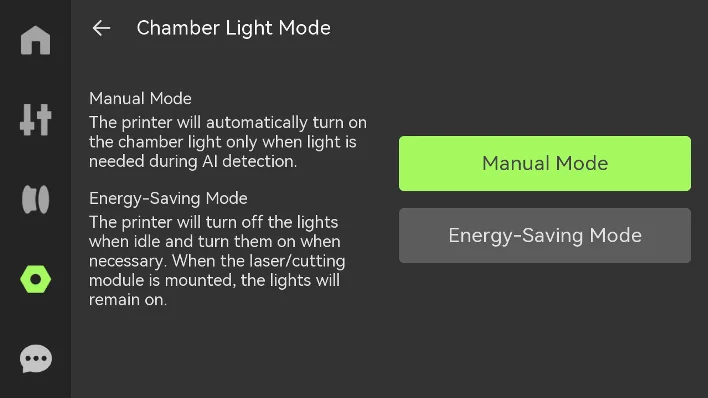
- Manual Mode: The light turns on automatically when required for AI detection. When checking print status or performing maintenance, you can manually switch the light on or off via Control › Light.
- Energy-Saving Mode: The light automatically turns off when the printer is idle and turns on only during operation or while a task is in progress to save energy.
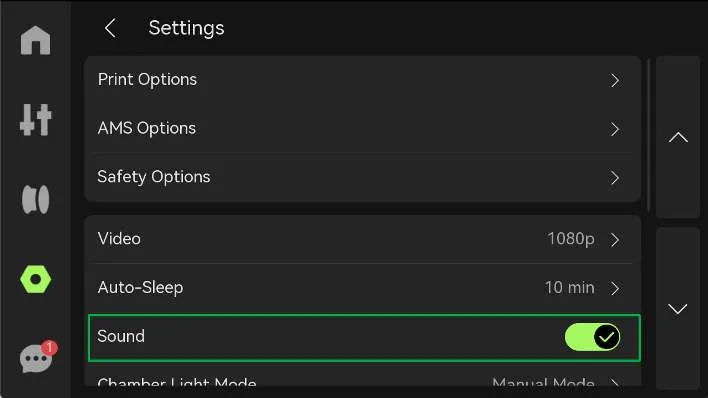
7.1.6 Sound
When enabled, the printer plays a notification sound when it powers on and when printing starts or finishes.
On the touchscreen, select Settings › Sound to turn it on or off.
7.2 Photo and Video
The printer is equipped with a 1920x1080, 30 fps HD live view camera located at the front left of the chamber. This camera is used for real-time monitoring, timelapse photography, photo and video recording, and intelligent detection.
7.2.1 Video Recording
The printer supports video recording throughout the entire print process, making it easy to review print status at any time and providing useful reference for troubleshooting and after-sales support. The printer includes a USB port to connect a USB flash drive for saving video files. See Connect USB Flash Drive for specifications and usage details.
You can turn video recording on or off in either of the following ways:
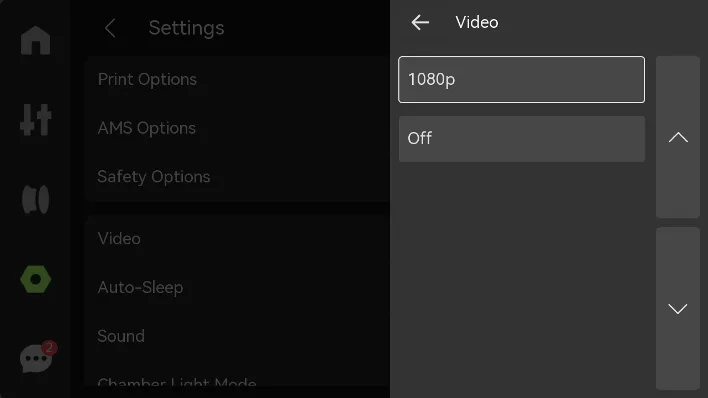
- On the printer screen, tap Settings › Video to turn the recording feature on or off and adjust the resolution.
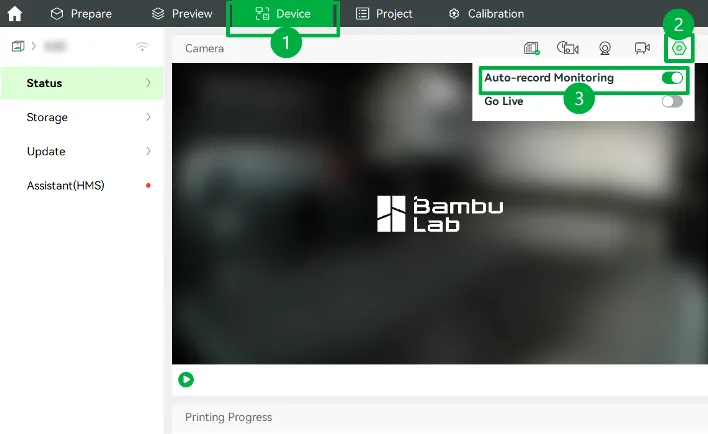
- In Bambu Studio, click Device › Camera › Camera Setting › Auto-record Monitoring to enable or disable video recording.
7.2.2 Photo
Use the live view camera to remotely monitor the printer and take photos to record the print status of your model.
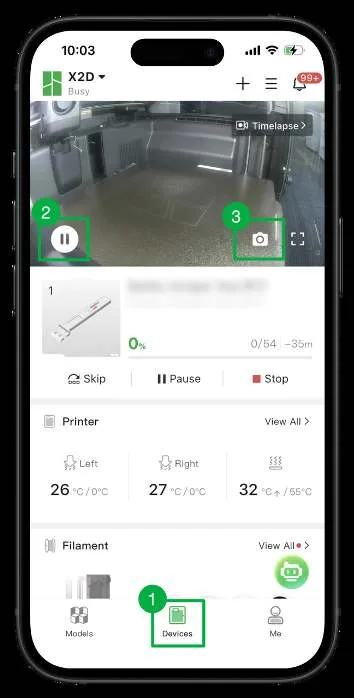
- Open the Devices page in Bambu Handy.
- Tap the play button to view the camera preview.
- Tap the camera button at the bottom right of the camera preview to take a photo. The photo will be saved to your phone’s photo album.
7.2.3 Timelapse
During printing, the printer automatically captures one photo per layer and combines them into a sped-up video.
How to Enable
When starting a print job, you can choose whether to enable timelapse.
- Printer touchscreen: On the Plate to Print page, expand Advanced Options › Timelapse, then tap to enable.
- Bambu Studio: After slicing, click Print plate/Print all in the upper-right corner. In the pop-up send print job window, find Timelapse and turn it On.
- Bambu Handy: On the Prepare to Print page, go to Options › Timelapse, and enable it.
Shooting Mode
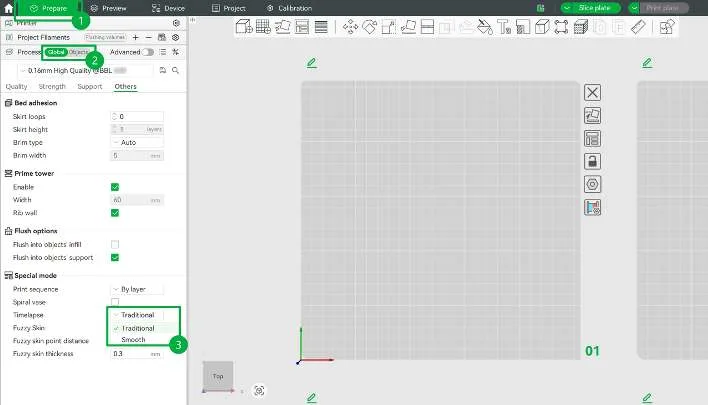
Timelapse offers two shooting modes. You can switch the modes on the Prepare page in Bambu Studio by navigating to Process › Global › Others › Special mode › Timelapse.
- Traditional mode (default): After each layer is printed, the printer takes a photo at the current position, and the toolhead stays at the end of the layer. As a result, you can see the toolhead moving in the video.
- Smooth mode: After each layer is printed, the toolhead moves to the prime tower or a safe position before taking a photo so the toolhead remains stationary in the video. This mode automatically generates a prime tower.
7.3 Connect to Network
This printer supports Wi-Fi and LAN-only mode. When LAN-only mode is enabled, you can further configure parameters in the developer mode.
7.3.1 LAN Only Mode
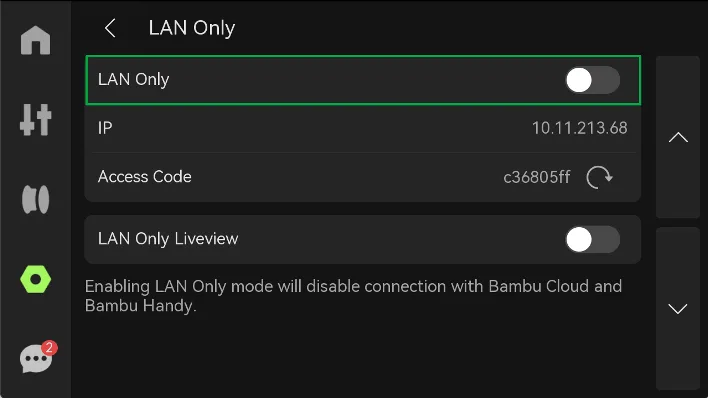
When enabled, the printer can only be accessed and controlled within the local area network. It cannot be accessed remotely via the internet, nor can it use cloud features such as Bambu Handy and print history. This mode is suitable for users or enterprise environments with higher data security and privacy requirements.
On the printer touchscreen, select Settings › LAN Only to enable LAN Only mode.
7.3.2 Developer Mode
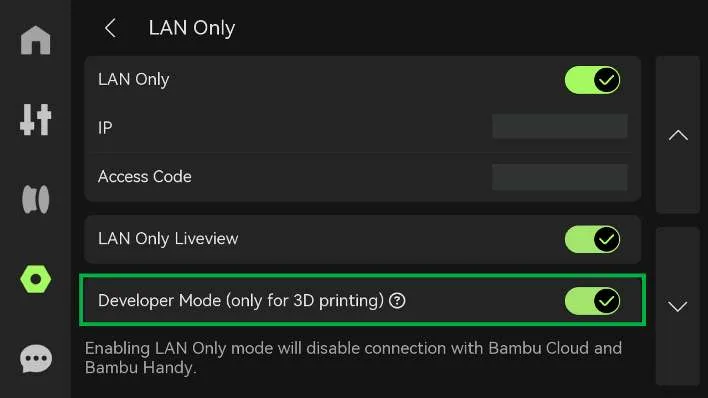
When enabled, the printer allows third-party software or devices to directly control and manage print tasks and process data. This offers greater flexibility and customization but may involve security risks.
After enabling LAN Only mode, enable developer mode in Settings › LAN Only › Developer Mode (only for 3D printing).
7.4 Connect USB Flash Drive
The printer is equipped with a USB port for importing sliced files, starting prints from the screen, and storing recordings, timelapses, and print cache.
7.4.1 Specifications
- Supports USB 2.0 and above protocols, compatible with FAT32 and exFAT file systems.
- The printer does not limit the USB flash drive’s capacity. The maximum supported capacity depends on the file system:
| File System | Operating System Used for Formatting | Maximum Capacity | Maximum Size for Single File |
|---|---|---|---|
| FAT32 | Linux or macOS systems | 2 TB | 4 GB |
| Windows | 32 GB | 4 GB | |
| exFAT | Any operating system | 128 PB | 16 EB |
7.4.2 Connect and Format
- Insert a compatible USB flash drive into the printer’s USB port.
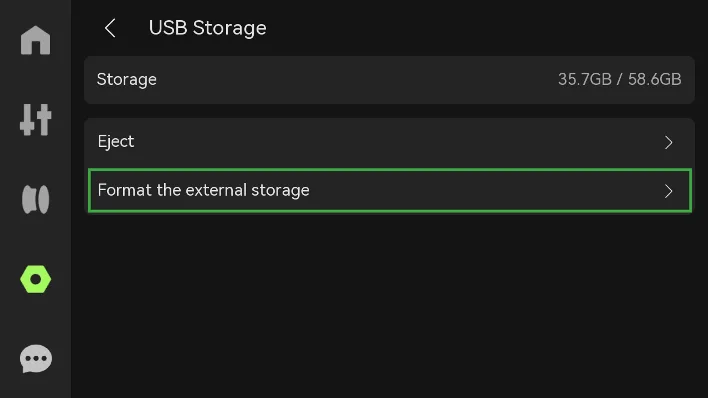
- Format the USB drive if needed. On the touchscreen, tap Settings › USB Storage › Format External Storage to format the USB drive as FAT32 (suitable for USB drives up to 2 TB).
7.4.3 Ejection
To eject the USB flash drive, select Settings › USB Storage › Eject to safely remove the drive and prevent data corruption.
7.5 Update and Restore
7.5.1 Update Firmware
The printer firmware is continuously updated for new features. When a new firmware version is available, you can update it using the following methods:
Online Update
When the printer is connected to Wi-Fi, you can update the firmware online from the touchscreen.
- After the new firmware is released, a prompt will appear on the printer screen. Tap Yes and follow the instructions to complete the update.
- You can also update manually by going to Settings › Firmware › Update.
Update Offline
If the printer is not connected to the internet, you can update the firmware using a USB drive and an offline update package.
- Insert and format a USB drive.
- Download the corresponding offline update package from the Bambu Lab firmware download page: bambulab.com/support/firmware-download/all.
- On the screen, select Settings › USB Storage › Eject to safely remove the USB drive.
- Copy the offline update package to the root directory of the USB drive.
- Reinsert the USB flash drive. On the touchscreen, select Settings › Firmware › Offline Update. Then, select the version to update to, and tap Update. Once it is complete, the printer will automatically restart.
7.5.2 Initialization
Reset the printer to its factory default state. All custom settings and user data will be erased. This action is irreversible, so make sure no important data remains before proceeding.
On the touchscreen, select Settings › Restore to Factory Settings to complete initialization.